I believe all of you are familiar with migrating Joomla and WordPress websites now. Well, basically all we need to do to transfer a website is to copy over the files and databases to the new server/domain name and adjust the configuration files according to the settings on the new server/domain name. Here, I am trying to share my knowledge on how to transfer Magento website to a new server/domain name.
Before starting with the transfer process, I would like to give you a brief info on the Magento files and folders.
The files and folders included in the Magento Installation root directory are as follows:-
=====
.htaccess – It contains mod_rewrite rules, which are essential for the Search Engine Friendly URLs. As you all know, you can mention the rules and directives to override the webserver and PHP settings.
.htaccess.sample – this is a backup of the .htaccess file. If you modify .htaccess it can be used in order to get the default settings.
404 (directory) – The folder stores the default 404 template and skin for Magento.
app (directory) – This folder contains the modules, themes, configuration and translation files. Also there are the template files for the default admin theme and the installation.
shell (directory) – Contains CLI tools such as the indexer to perform maintenance tasks from command line.
cron.php – Magento uses the cron.php file to manage and dispatch cronjobs. The cron.php script basically executes the internal Magento cronjob manager, managing which and when cronjobs are executed. A Cron Job should be set for this file and the recommended schedule is every 5 minutes.
downloader (directory) – This is the storage of the web downloader files. They are used for the installation and upgrade of Magento through the browser.
favicon.ico – The default favicon for Magento. A small icon that is shown in the browser’s tool bar once your web site is loaded.
index.php – The main index file for Magento.
index.php.sample – A backup of the default index file. It can be used to revert the changes in a case of a index.php modification.
js (directory) – Contains the pre-compiled libraries of the JavaScript code included in Magento.
lib (directory) – The Magento core code is located in this folder. It contains the software’s PHP libraries.
LICENSE_AFL.txt – The Academic Free License under which the Magento software is distributed.
LICENSE.txt – The Open Software License under which the Magento software is distributed.
media (directory) – This is the storage of the Magento media files – images out of the box, generated thumbnails, uploaded products images. It is also used as a container for importing images through the mass import/export tools.
mage.php – This file controls the automatic update through the downloader script and SSH. It handles the update of each individual Magento module. You can also obtain the magento version from this file.
php.ini.sample – This file contains sample php directives that can be used in order to modify your PHP setup. If you want to alter the default setup edit the file and then rename it to php.ini.
pkginfo (directory) – Contains files with information regarding the modules upgrades’ changes.
report (directory) – This folder contains Magento error reports.
skin (directory) – Includes the themes files – images, JavaScript files, CSS files, Flash files. You can also find the skin files for the installation of skins and administration templates here.
var (directory) – Cache, sessions, database backups, data exports and cached error reports can be found in this directory;
If you want to modify an existing template or set a new one you should know that the template files are separated in 3 folders:
app/design/frontend/default/YOUR_TEMPLATE_NAME/layout/ – Contains the .xml files that define which modules should be called by the template files.
app/design/frontend/default/YOUR_TEMPLATE_NAME/template/ – Contains files and subfolders that structure the final output for the users using the functions located in the layout/ folder.
/skin/frontend/default/YOUR_TEMPLATE_NAME/ – Contains the CSS, images, JavaScript and Flash files related to the template.
=====
Okay, now that you have a basic idea of the Magento files and folders, I will proceed with the migration process.
As said earlier, you will need to copy the files and databases over to the new server.
If you don’t have root access on the destination server, then you will need to migrate the website manually.
STEP 1: Backup the Magento database.
You can find the database used by the website in the “app/etc/local.xml” file in the Magento installation root.
If you have shell access you can use the mysqldump utility to generate the backup:-
#mysqldump databasename > backupfilename.sql
If you have any control panels installed on the source server, you can do this easily with the control panel backup tools or the “export” functionality in phpMyAdmin to backup the database.
STEP 2: Backup the website files.
If you have shell access on the source server generate a .tar archive of the website files.
#tar -czf websitefiles.tar.gz /path_to/website_file_directory
STEP 3: Transfer of data
Transfer the website files and database backups to the destination server. You can use FTP or SSH to transfer the files based on the level of access you are provided on the source and destination servers.
STEP 4: Content extraction on destination server
Extract the file backup archive in the document root for the website on the destination server.
#tar -xf websitefiles.tar.gz
Or, you can use the file manager in your control panel to extract the archive.
STEP 5: Prerequisite DB operations
Create a database, database user, give access for MySQL user to the database and restore the database on the destination server. You can do this from the control panel if you have control panel or root access on the destination server.
STEP 6: DataBase re-configuration
Once you have transferred the files to the document root of the website on the new server and restored the database on the new server, now its time to play with the database configuration settings.
The main configuration file for Magento is “app/etc/local.xml“. You should be editing the following files in the file:-
<host><![CDATA[HOSTNAME]]></host>
<username><![CDATA[USER]></username>
<password><![CDATA[PASSWORD]]></password>
<dbname><![CDATA[DATABASENAME]]></dbname>
where:
HOSTNAME should be the database hostname, most commonly – localhost.
USER is the database user you created on the destination server.
PASSWORD is the password for the database user.
DATABASENAME is the complete database name for the new database you created on the destination server to use for the Magento website.
If you are transferring the Magento store to a new server under the same domain name, the migration is almost done and you can skip to STEP 8.
However, if you are transferring the store to under a different domain name say like from “example.com“ to “test.example.com” there are a few more settings you have to change. If so, proceed to next step.
STEP 7: Base URL modification
If you are migrating the Magento website to under a new domain name on the destination server, you will have to change the Base URLs for the Magento store on the destination server.
You can change this in 3 ways.
Method 1: Through Magento admin panel:
Changing Base URL settings through Magento admin panel is explained in the following steps
a. Login to Magento admin panel.
b. Go to System -> Configuration.
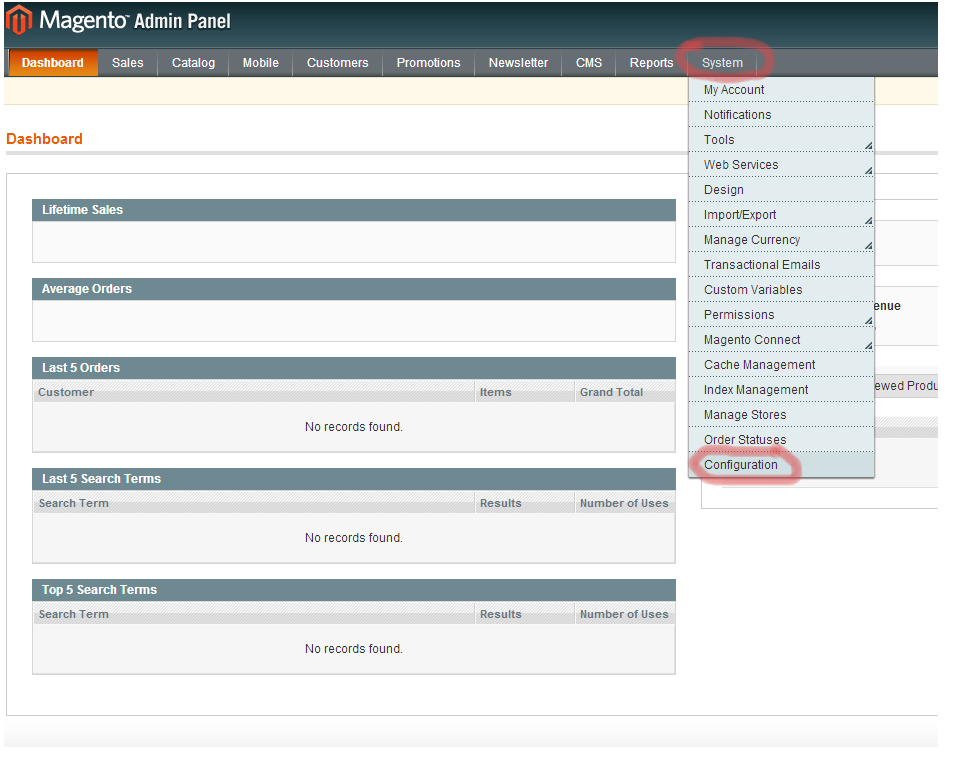
c. On the left menu, click Web.
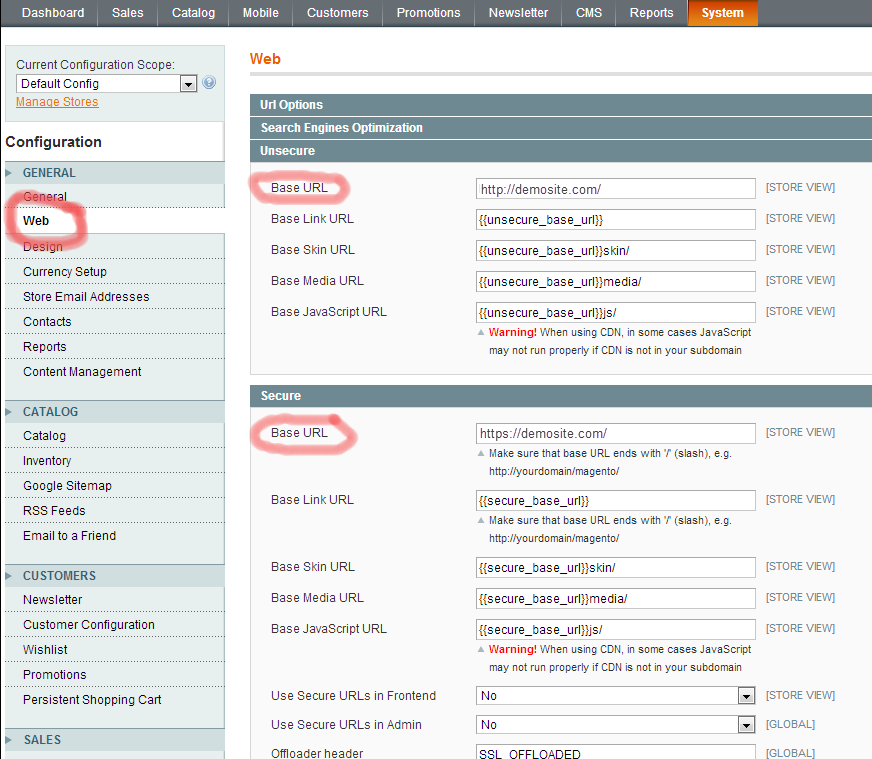
d. Open the Unsecure and Secure drop downs, locate the base URL line, and replace this with the new URL and click on the “Save Config“.
e. Clear the Magento cache. (Refer to STEP 9).
Method 2: Using phpMyAdmin
You can change Base URL settings through phpMyAdmin as well
a) Login to PHPMyadmin.
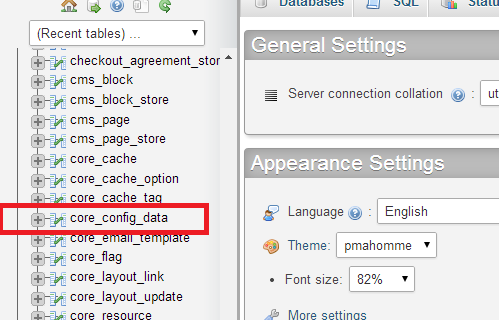
b) In the left pane click on the “+” sign before the name of the desired Magento database.
c) You can now see the tables in the database listed in the left pane. Locate the table core_config_data and access it by clicking on the table name.
d). Locate the rows “web/unsecure/base_url” and “web/secure/base_url” and click Edit (the pencil icon) in the corresponding lines.
e). Change the base URL to the domain name to under which the Magento store is migrated and click OK.
Please note that the path URL should be the complete path URL in which Magento is installed on the destination server. For example, if Magento store is moved to “testsite.com” under directory “magento”, the base URLs should be set as shown in the image below.

Method 3: Through Command Line
Follow the below explained steps to change Magento base URLs through the command line.
If you don’t have phpMyAdmin access, but have shell access for the account, you can connect to the MySQL database through the command line and execute the following commands:-
A. Follow the steps A & B if you are a MySQL root. If you are granted only with a MySQL user access, go directly to Step C
[~]# mysql
Welcome to the MySQL monitor. Commands end with ; or \g.
Your MySQL connection id is 59579995
Server version: 5.5.42-cll MySQL Community Server (GPL)

Copyright (c) 2000, 2015, Oracle and/or its affiliates. All rights reserved.

Oracle is a registered trademark of Oracle Corporation and/or its
affiliates. Other names may be trademarks of their respective
owners.

Type 'help;' or '\h' for help. Type '\c' to clear the current input statement.

mysql>
B. Once logged in switch to the corresponding Magento Db for your site. For eg: let us assume that the db name is online_db
mysql> use online_db;
Reading table information for completion of table and column names
You can turn off this feature to get a quicker startup with -A

Database changed
mysql>
C. After switching to the db, list the tables and identify the exact table name for the “core_config_data” table. Some times there may be table prefixes as in the example shown.
A typical Magento db has a long list of tables and the output shown below is an extract to help you to distinguish the table name with table prefix.
mysql> show tables;
+---------------------------+
| Tables_in_online_db |
+---------------------------+
| mage_core_cache_tag |
| mage_core_config_data |
| mage_core_email_template |
| mage_core_flag |
| mage_core_layout_link |
+---------------------------+
As you can see from the above list, the table name here is “mage_core_config_data” instead of a default “core_config_data”. The table prefixes get changed as per the installation preferences and hence you should be very careful about execution of any queries on the table.
Also please note that the table name “mage_core_config_data” is just an example and shouldn’t be confused with the table names given in the following steps.
We will continue to use the default table names ie “core_config_data” in the entire article.
D. Now, execute the following query to identify the current Base URL settings:-
mysql> select * from core_config_data where path like '%base%url%';
E. To change the base URLs, execute the following commands:-
mysql> update core_config_data set value = 'http://newdomainname/' where path = 'web/unsecure/base_url';

mysql> update core_config_data set value = 'http://newdomainname/' where path = 'web/secure/base_url';
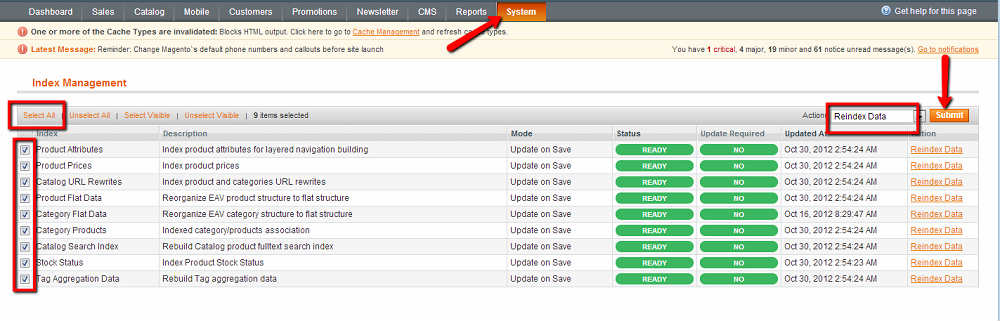
STEP 8: Re-index your products and URL re-writes.
If you have shell access, you can re-index the products by executing the following command from the Magento root:-
#php indexer.php --reindexall
If you don’t have shell access, you can re-index the products from Magento admin panel -> System -> Index Management.
STEP 9: Clear the Magento cache.
It is very important that you clear the Magento cache after migrating the site to a new server/domain name.
You can clear the Magento cache in two different Methods.
Method 1:
The easiest method is to remove all the cache files in the directory “var/cache” in the Magento installation root.
You can also clear the session files in the “var/session” directory in the Magento installation root.
You can do this through the File Manager in the control panel or through FTP or through terminal access.
Method 2: Clearing Magento cache from Magento admin panel:-
Log into the Magento admin panel ->Access System -> Cache Management
and click on Flush Magento and Flush cache storage.