As mentioned in my blog on “OpenStack Cloud Computing Fundamentals”, Cloud computing is the method of using a network of remote servers to store, process and manage data rather than using a local server to process data. ie; storing and accessing data and programs over the Internet instead of your local computer’s hard drive.
Infrastructure as a service provides virtualized computing resources over the Internet. The computing resource includes virtual machines, networking, storage etc. Instead of buying a hardware, the cloud user can use the required hardware provided as a service in the cloud computing model. The user can purchase IaaS on a consumption basis. ie; he needs to pay only for the hardware or networking or storage he uses. In general, IaaS provides infrastructure/hardwares as a service to the cloud user on a pay-per-use basis.
OpenNebula is a simple and easy to deploy cloud computing model. Its deployment is as easy as deploying a virtualization technology on a single node and as efficient as an OpenStack or any other cloud computing architectures that runs on a multihost environment.
OpenNebula provides Infrastructure As A Service (IaaS) cloud computing model for private, public and hybrid cloud platforms. It uses many services running together to provide IaaS as a service to the end user. It provides standardization and portability, providing cloud users and admins with a choice of multiple cloud interfaces like Amazon EC2, vCloud etc and hypervisors Xen, KVM and VMware.
I’m using a single node for installation and configuration of all the required basic services of OpenNebula to create a cloud model to provide infrastructure as a service. Or in other words we use the basic services of OpenNebula to create a cloud model that can be used to deploy Virtual Machines based on IAAS. ie; we can change/modify the characteristics of the VM on the go. There are also many other advantages of using a cloud platform like live migration of VM’s, cloning of VM’s, resizing the disk on a VM etc. We will look into each of these factors in this tutorial.
Preflight Configuration
1) Check if virtualization extension is supported on your hardware using the following command
root@opennebula:~# grep -E 'svm|vmx' /proc/cpuinfo
You should get an output similar to the one shown in the screenshot below.
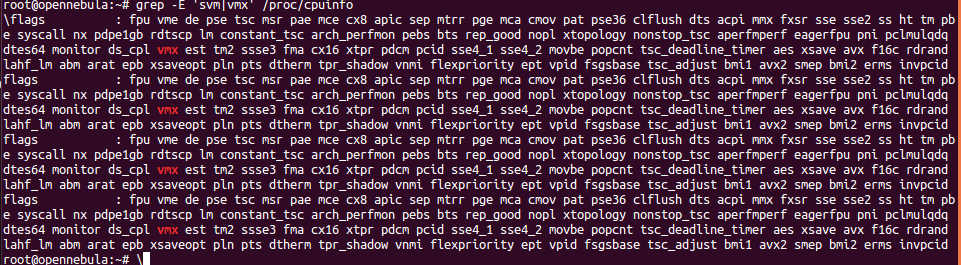
If you don’t get any output you probably don’t have virtualization extensions supported/enabled in your server.
2) Configure Network
You should have your main network interface, typically eth0, connected to a bridge. I’m using br0 as the bridge.
Open the file /etc/network/interfaces and the below mentioned entries.
===============================
auto lo
iface lo inet loopback
auto br0
iface br0 inet static
address 192.168.1.2
netmask 255.255.255.0
gateway 192.168.1.1
bridge_ports eth0
bridge_fd 9
bridge_hello 2
bridge_maxage 12
bridge_stp off
===============================
Replace address, netmask and gateway according your network architecture. In this example my OpenNebula server runs on 19.168.1.2 and I’m using static network configuration.
Restart networking service for the changes to take effect.
root@opennebula:~# service networking restart
Installation And Configuration
I’m using a single Ubuntu 12.04 Node for the installation and configuration of all the services required. Also, I’m using KVM as the virtualization hypervisor for the cloud environment. After following this tutorial you will have a OpenNebula GUI(sunstone service) and a KVM hypervisor host and atleast one running VM’s. You can use sunstone(GUI) for managing the VM’s you deploy.
The services that OpenNebula use are mentioned below. We don’t need all of these services to get the basic setup running.
- opennebula-common: Provides the OpenNebula user and common configuration files
- libopennebula-ruby: This package provides all the required ruby libraries for OpenNebula
- opennebula-node: Prepares a node as an opennebula-node (the node which runs the hypervisor)
- opennebula-sunstone: Sunstone provides the web interface for OpenNebula administration and management.
- opennebula-tools: Provides the CLI for OpenNebula administration.
- opennebula-gate: Gate server that enables communication between VMs and OpenNebula.
- opennebula: The primary OpenNebula Daemon.
1) Update Ubuntu Repository to have OpenNebula packages.
root@opennebula:~# wget -q -O- http://downloads.opennebula.org/repo/Ubuntu/repo.key | apt-key add<strong> -</strong>

root@opennebula:~# echo "deb http://downloads.opennebula.org /repo/Ubuntu/12.04 stable opennebula" > /etc/apt/sources.list.d /opennebula.list
Note: Make sure to change the 12.04 in the above step to 14.04 if you are using Ubuntu 14.04.
2) Install all the required packages after updating the repo
root@opennebula:~# apt-get update

root@opennebula~# apt-get install opennebula opennebula-sunstone opennebula-node bridge-utils
As you can see we are using only the basic services to get the cloud running.
3) Configure and Start the Basic Services
Two main processes must be started to get the cloud running, the main OpenNebula daemon named oned, and the graphical user interface named sunstone.
Sunstone listens only in the loopback interface by default for security reasons.
To change this default setting, edit /etc/one/sunstone-server.conf and change host: 127.0.0.1 to :host: 0.0.0.0.
4) Restart the Sunstone service as mentioned below:
root@opennebula:~# /etc/init.d/opennebula-sunstone restart
5) QEMU configuration:
OpenNebula creates a default user for all the OpenNebula services, the user named oneadmin.
We need to provide the oneadmin user the ability to manage libvirt with root privileges.
Edit/Modify /etc/libvirt/qemu.conf with the following entries
=======================
user = “oneadmin”
group = “oneadmin”
dynamic_ownership = 0
=======================
6) Restart libvirt to for these changes to take effect:
root@opennebula:~# service libvirt-bin restart
SUNSTONE GUI
You can use sunstone, the OpenNebula GUI, for accessing and managing the OpenNebula VM’s.
To access the GUI, in any web browser enter the below mentioned URL:
http://192.168.1.2:9869
Note: Enter the IP address of your OpenNebula Node as per your network configuration. In this example, my OpenNebula node runs at 192.168.1.2
Once done, you will get a login screen of OpenNebula sunstone interface as shown in the screenshot below.
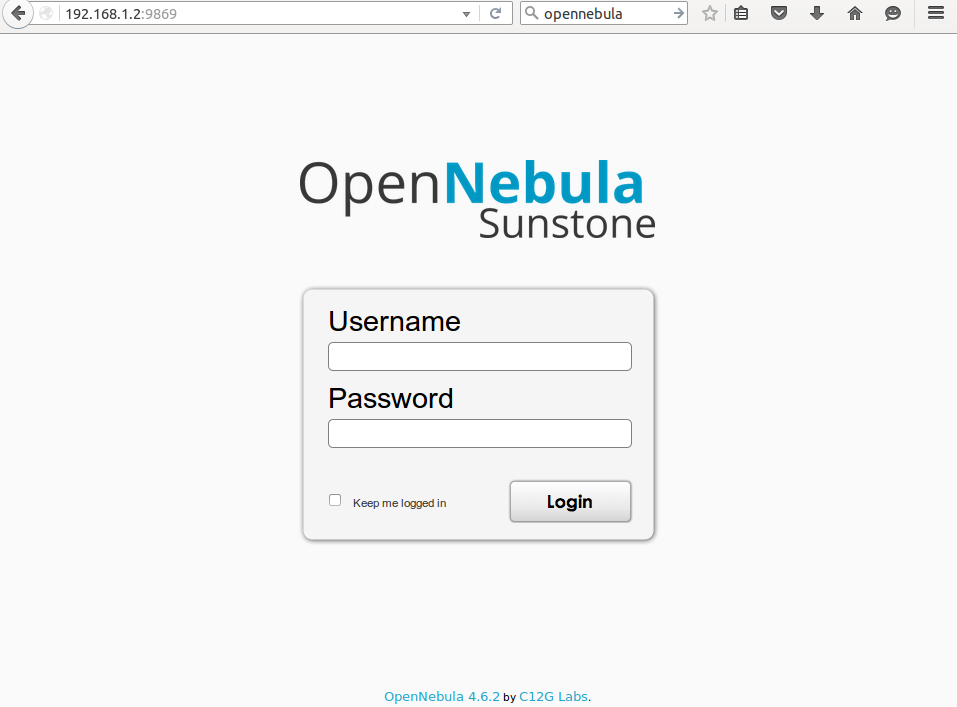
The default password for the oneadmin user can be found in /var/lib/one/.one/one_auth which is randomly generated on every new installation.
Login with oneadmin as user and the associated password from the above mentioned file.
You will get the OpenNebula Sunstone GUI as shown below. The below screenshot shows 3 VM’s already created with one host. You should see zero VM’s and zero Hosts as of now.
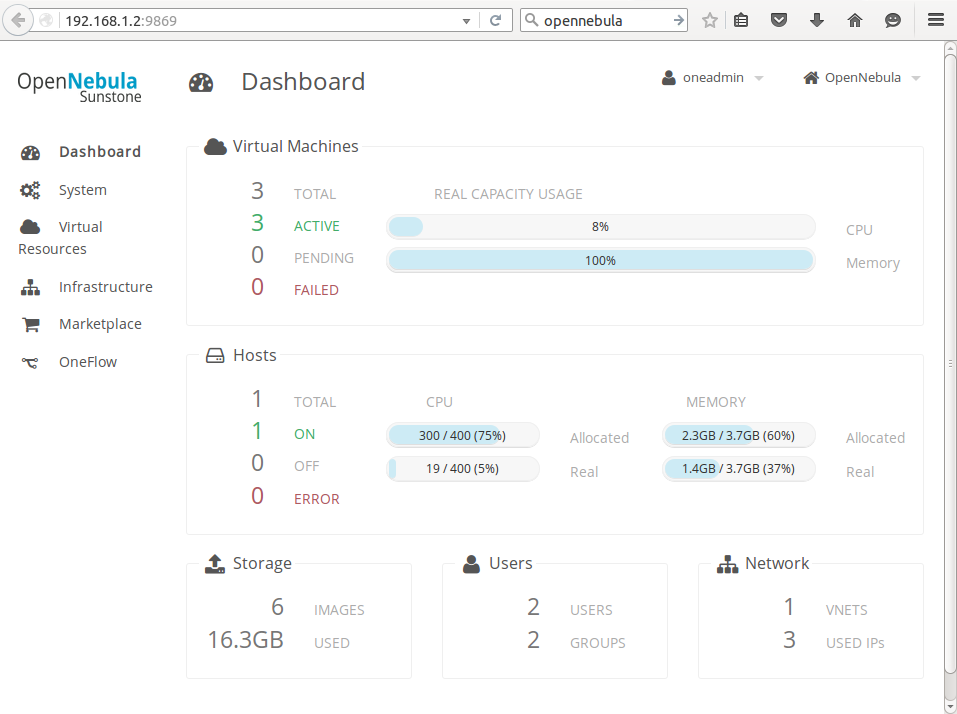
Now we have all the basic services running to provide IAAS with OpenNebula as the cloud architecture host. Also we have the GUI running for the management and administration of OpenNebula VM’s.
In the next blog, we will see how to administer OpenNebula for creating and managing Virtual Machines.
![]()
Recommended Readings
OpenNebula on Ubuntu – Part 2 – VM Creation and Management