In this part, we will see the steps on OpenNebula VM creation. We’ll also discuss how to deploy and manage VM’s that run using OpenNebula Cloud architecture.
As we have already configured OpenNebula server on 192.168.1.2, Sunstone GUI is available at http://192.168.1.2:9869 for OpenNebula administration.
There are mainly three virtual resources to be used to get a VM running.
Worker Host Registration
A worker node is the node where the hypervisor part of the OpenNebula service resides. In order to get a VM in running state, we need to specify the host where the hypervisor runs. ie; we need to specify a worker node. Technically we say, we have to register a Worker Node for OpenNebula.
Here I’m using OpenNebula CLI command to create or register the worker node. Use the following command to register a worker node.
Note: Never run OpenNebula CLI commands as root user, rather use oneadmin as the user.
root@opennebula:~# su - oneadmin<strong>
</strong>

oneadmin@opennebula:~$ onehost create localhost -i kvm -v kvm -n dummy
You can confirm the worker node registration using the below command.
oneadmin@opennebula:~$ onehost list
This should list the OpenNebula host as shown in the screenshot below.

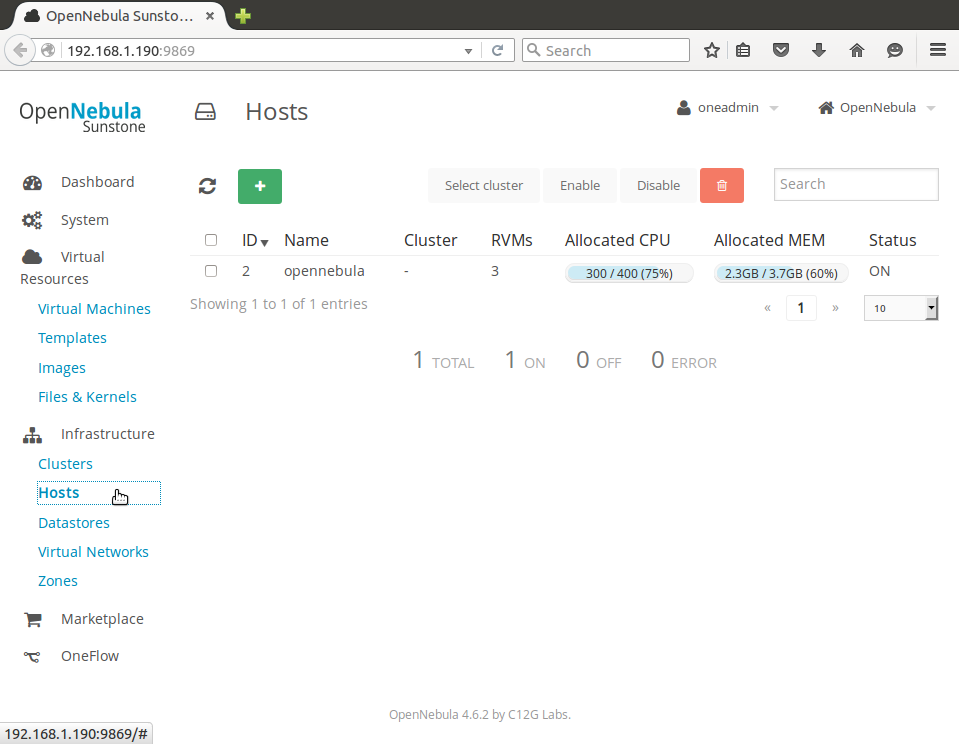
You can use Sunstone GUI also to confirm the worker node creation.
Login to Sunstone GUI as oneadmin user. Traverse to “Hosts” option under the “Infrastructure tab” on the left side of GUI. See screenshot below.
Virtual Network Creation
Once the worker node is registered, we need to create a virtual network. Here we allocate a range of IP addresses as a network service so that, the range of IP address is used when allocating IP’s for the VM’s. Each VM gets allocated the IP address we mentioned in the Network service.
To create a virtual network we create a network template file first.
Create a file named network_my.one with the following entries.
=============================
NAME = “private”
TYPE = FIXED
BRIDGE = br0
LEASES = [ IP=192.168.1.207 ]
LEASES = [ IP=192.168.1.206 ]
–
–
LEASES = [ IP=192.168.1.xxx ]
=============================
All the IP addresses that needs to be assigned to VM’s should be configured under the LEASES section of the network_my.one file. All the VM’s get allocated an IP address from the LEASES available.
Now we use the OpenNebula CLI to activate or register the Network service as follows.
oneadmin@opennebula:~$ onevnet create mynetwork.one
Verify the Network service registration using the following command.
oneadmin@opennebula:~$ onevnet list

To get a detailed list of the network use the below mentioned command.
oneadmin@opennebula:~$ onevnet show 1
The 1 in the above command is the Network ID from the above “onevnet list” CLI command output. This should return the Network LEASES configured for OpenNebula Virtual Network as shown in the screenshot below.
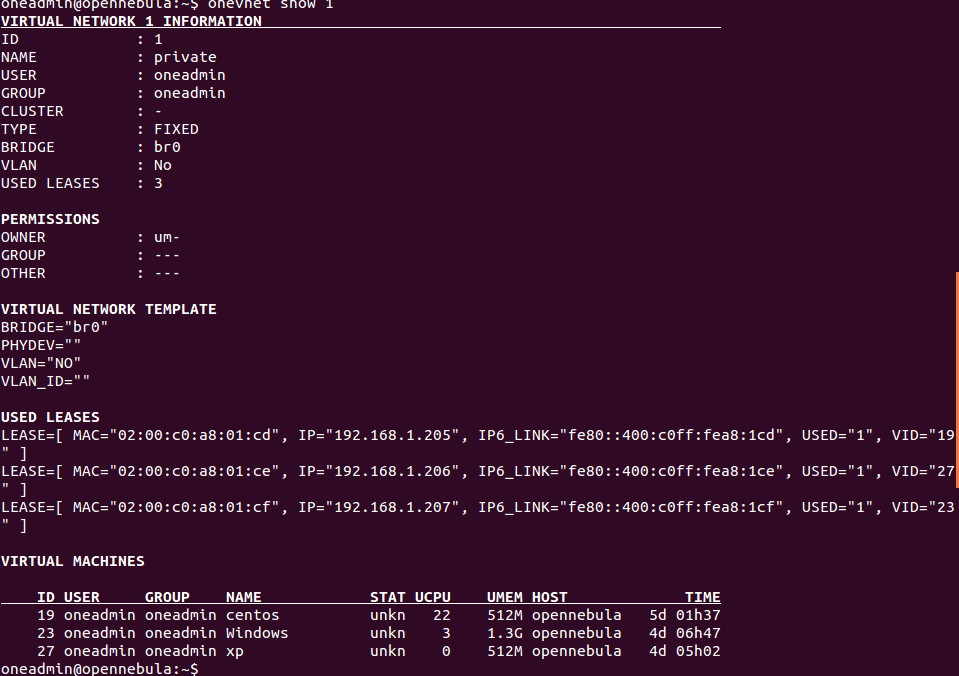
My screen shot shows 3 VIRTUAL MACHINES configured, but you should not have any VM’s listed as of now.
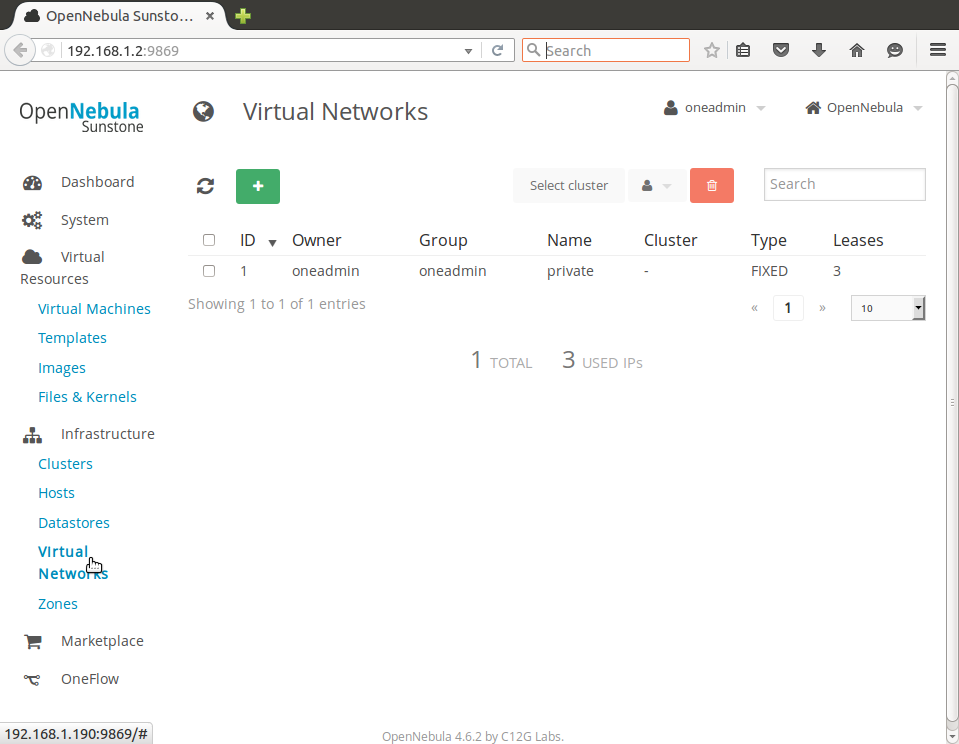
You can also use the Sunstone GUI for listing and managing the created Network. Goto the “Virtual networks” option under the “Infrastructure” tab of Sunstone as shown in the screenshot below.
VM Image Creation
Once the Worker Node and the Network is defined and configured, we need to create Image service for Virtual Machines. Since we are using KVM virtualization technology, the VM images supported are of qcow2 format.
You can get the qcow2 format KVM image for almost all distributions.
I’ll show how to create a CentOS KVM image to be used with OpenNebula. Here I use an external repository to get the CentOS qcow2 image for KVM.
Use the OpenNebula CLI command as shown below to create your OpenNebula Image.
oneadmin@opennebula:~$ oneimage create --name "CentOS-6.4_x86_64"
--path "http://mirrors.karan.org/centos-cloud/i/one/c6-x86_64-20130910-1.qcow2.bz2" --driver qcow2 --datastore default
The above command will download the qcow2 KVM CentOS image “c6-x86_64-20130910-1.qcow2.bz2” and will use it to create the OpenNebula image named “CentOS-6.4_x86_64”
Verify the image service using the below CLI command.
oneadmin@opennebula:~$ oneimage list
The output should list the OpenNebula image named “CentOS-6.4_x86_64” with STAT as “rdy” and “TYPE” as OS as shown in the below screenshot.
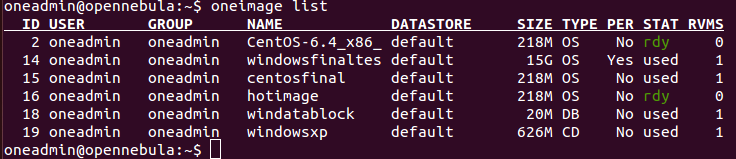
It takes a little time for the image status to be in READY state, as OpenNebula first downloads the image from web and then creates it.
You can also use the GUI to list and manage the images. Goto the “Images” option under the “Virtual Resources” tab of Sunstone as shown in the screenshot below:

My screenshots will have multiple images listed as I’ve created more than one image. As of now, yours should have only one image named “CentOS-6.4_x86_64” listed.
VM Template Creation
A VM is deployed using a template. So the template should have all the required information about the VM to be created. The basic details that a template must have are the OpenNebula Image to be used for the VM, the Virtual Network to be used, the Number of CPU’s and VCPU’s, amount of memory to be allocated for the VM, the OS architecture and the template name. So a template, as for all other cloud systems, is used to describe the properties of a Vitrual Machine.
Use the OpenNebula CLI command as shown below to create your OpenNebula Template.
oneadmin@opennebula:~$ onetemplate create --name "CentOS-6.4" --cpu 1 --vcpu 1 --memory 512 --arch x86_64 --disk "CentOS-6.4_x86_64" --nic "private" --vnc --ssh
Note: Here the –name defines the template name,
–disk refers the Image name to be used
–nic option specifies the Virtual network to be used
–cpu and –vcpu defines the number of cpu’s and virtual cpu’s to be used respectively
–memory defines the amount of memory to be allocated to the VM
–arch defines the architecture of the VM’s operating system(32/64bit)
and –vnc and –ssh enables vnc server and ssh server on the virtual Machine.
You can verify the Template creation by using the following command.
oneadmin@opennebula:~$ onetemplate list
This will list the created OpenNebula templates as shown in the screenshot below:

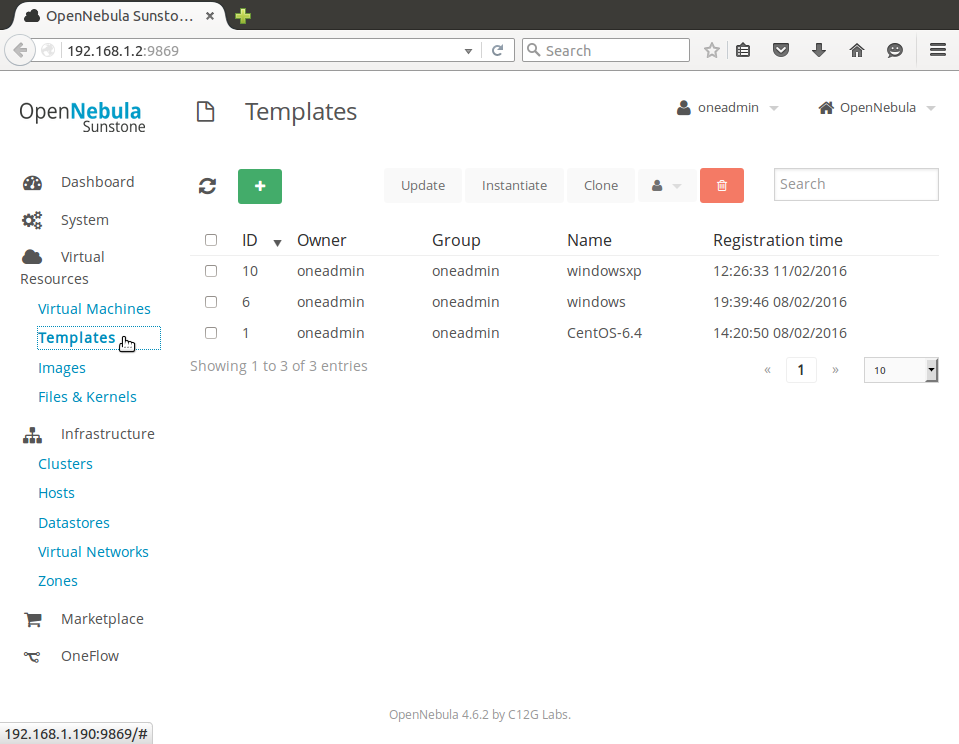
My screenshot shows three templates, but you should have only one Template named “CentOS-6.4” as of now.
You can also verify this from the Sunstone GUI. Goto “Templates” option under the “Virtual Resources” tab of Sunstone as shown in the screenshot below to list the available templates(I’ve three templates, you should have only one):
DEPLOY VM
This is the easiest step. You can deploy your VM using the OpenNebula CLI command as shown below.
oneadmin@opennebula:~$ onetemplate instantiate "CentOS-6.4" --name "centos"
The above command will create and deploy a VM named “centos” using the “centos-6.4” template.
You can verify the status of the deployed VM using the below CLI command
oneadmin@opennebula:~$ onevm list
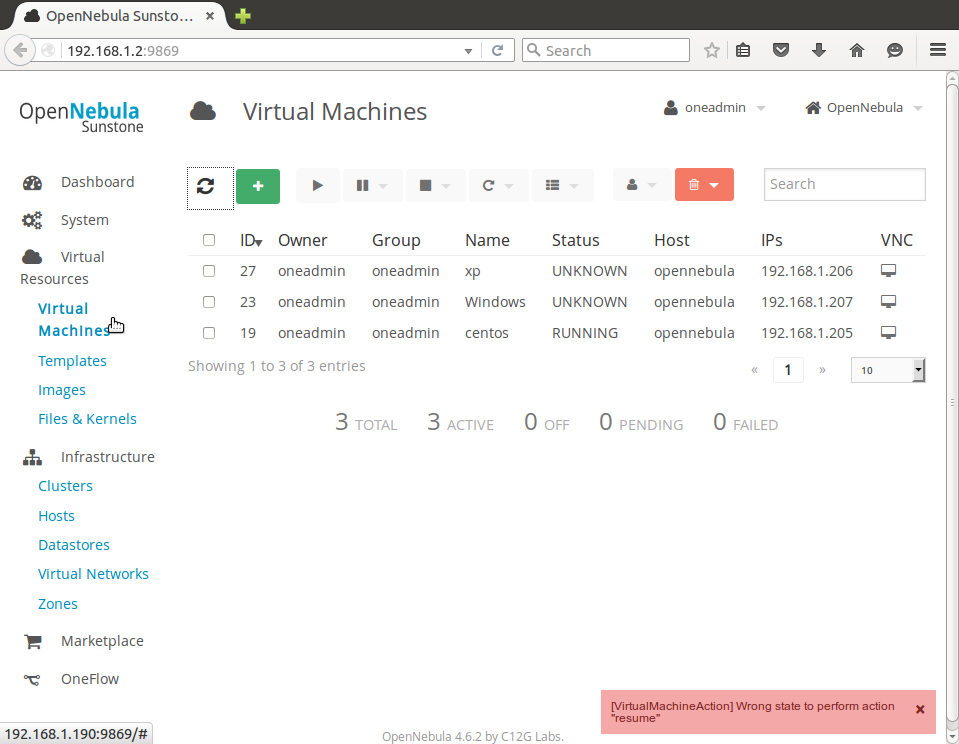
This should list the newly created VM. See the screenshot below. My screenshot shows three VM’s, but you should have only one.

You can also verify this from the Sunstone GUI. Goto “Virtual Machines” option under the “Virtual Resources” tab of Sunstone as shown in the screenshot below to list the deployed VM (I’ve three VM’s listed, you should have only one):
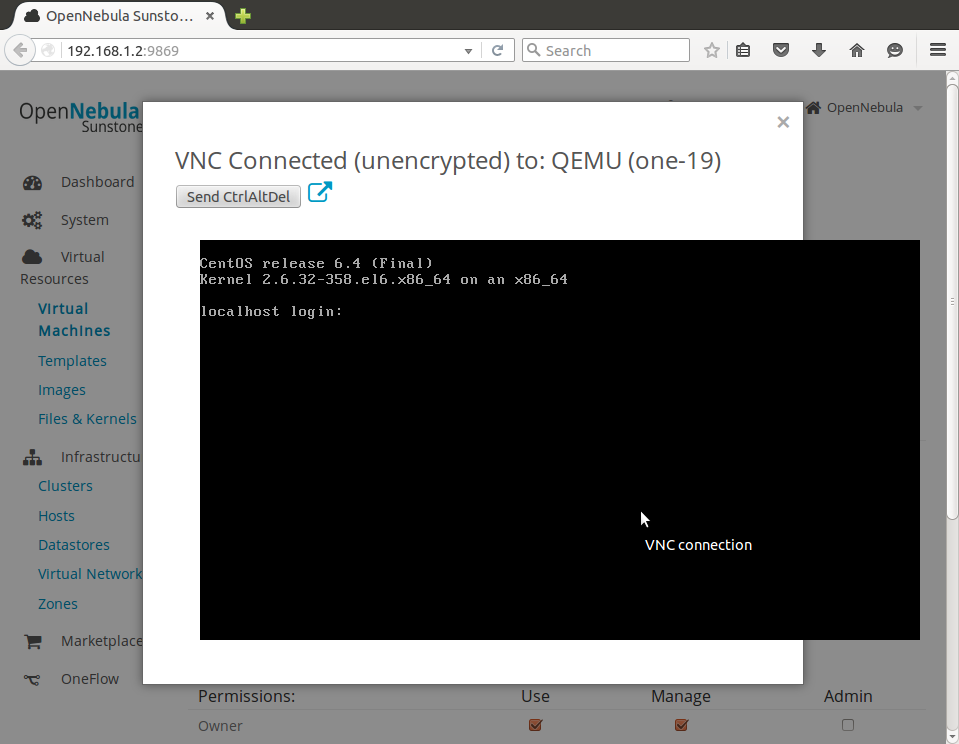
Make sure that the VM state is RUNNING. It takes a little time for the VM status to be in RUNNING. Once the state is RUNNING, you can use the VNC viewer to see the VM console. Or you can SSH to the VM from a different machine. The below screenshot shows the VNC viewer of the CentOS VM created from the Opennebula Sunstone GUI.
Now we have deployed a VM using the OpenNebula CLI commands. Use the same parameters/arguments/values that we used in the CLI commands to create the OpenNebula services if you are using the Sunstone GUI.
![]()
Recommended Readings
OpenNebula IaaS Cloud Installation on Ubuntu LTS – Part 1