
Pre-requisities:
- Ubuntu Server with root access
- Jenkins root accces
Installing Sonarqube:
- Prepare your server for installation
sudo apt update
sudo apt upgrade -y
2. Install OpenJDK 11
3. Install and Configure PostgreSQL
a. Add PostgreSQL repository.
sudo sh -c 'echo "deb http://apt.postgresql.org/pub/repos/apt/ `lsb_releaseb. Add PostgreSQL signing key.
wget -q https://www.postgresql.org/media/keys/ACCC4CF8.asc -O - | sudo apt-key add -c. Install PostgreSQL
sudo apt install -y postgresql postgresql-contribd. Enable DB server to start automatically on reboot
sudo systemctl enable postgresqle. Start DB server.
sudo systemctl start postgresqlf. Change the default PostgreSQL password.
sudo passwd postgres
h. Create a user named sonar.
createuser sonari. Log into PostgreSQL.
psqlj. Set a password for the sonar user. Use a strong password in place of my_strong_password
ALTER USER sonar WITH ENCRYPTED password 'my_strong_password';k. Create SonarQube database and set its owner to sonar.
CREATE DATABASE sonarqube OWNER sonar;l. Grant all privileges on SonarQube database to the user sonar.
GRANT ALL PRIVILEGES ON DATABASE sonarqube to sonar;m. Exit PostgreSQL.
\qn. Return to your non-root sudo user account.
exit4. Download and Install SonarQube
sudo apt install -y zipLocate the latest download URL from the SonarQube official download page.
Download the SonarQube distribution files. (you can download the latest SonarQube distribution using the following link)

https://www.sonarsource.com/products/sonarqube/downloads/?source=post_page-----7b3c08431dd9---------------------------------------
Here we are installing the latest version of SonarQube 10.0 community edition
sudo wget https://binaries.sonarsource.com/Distribution/sonarqube/sonarqube-10.0.0.68432.zipUnzip the downloaded file.
sudo unzip sonarqube-10.0.0.68432.zipMove the unzipped files to /opt/sonarqube directory
sudo mv sonarqube-10.0.0.68432 sonarqube
sudo mv sonarqube /opt/
5. Add SonarQube Group and User
Create a sonar group and user
sudo groupadd sonar
sudo useradd -d /opt/sonarqube -g sonar sonar- Grant the sonar user access to the /opt/sonarqube directory.
sudo chown sonar:sonar /opt/sonarqube -R6. Configure SonarQube
a. Edit the SonarQube configuration file.
sudo nano /opt/sonarqube/conf/sonar.propertiesStep 1: Find the following lines.
#sonar.jdbc.username=
#sonar.jdbc.password=
Step 2: Uncomment the lines, and add the database user sonar and password my_strong_password you created in Section 3.
sonar.jdbc.username=sonar
sonar.jdbc.password=my_strong_password
Step 3: Below those two lines, add sonar.jdbc.url.
sonar.jdbc.url=jdbc:postgresql://localhost:5432/sonarqubeStep 4: Save and exit the file.
b. Edit the sonar script file.
sudo nano /opt/sonarqube/bin/linux-x86-64/sonar.shStep 1: About 50 lines down, locate this line.
#RUN_AS_USER=Step 2: Uncomment the line and change it to.
RUN_AS_USER=sonarStep 3: Save and exit the file.
7. Setup System Service
Create a system service file to start SonarQube at system boot.
Step 1: Paste the following lines to the file.
[Unit]
Description=SonarQube service
After=syslog.target network.target

[Service]
Type=forking

ExecStart=/opt/sonarqube/bin/linux-x86-64/sonar.sh start
ExecStop=/opt/sonarqube/bin/linux-x86-64/sonar.sh stop

User=sonar
Group=sonar
Restart=always

LimitNOFILE=65536
LimitNPROC=4096

[Install]
WantedBy=multi-user.target
Step 2: Save and exit the file.
Enable the SonarQube service to run at system startup.
sudo systemctl enable sonarStart the SonarQube service.
sudo systemctl start sonarCheck the service status.
sudo systemctl status sonar8. Create the token for user
- You can login to the sonarqube dashboard using the URL http://<IP-address>:9000
- The default username will be “admin” and password will also be “admin”
- After login go to Administration -> Users
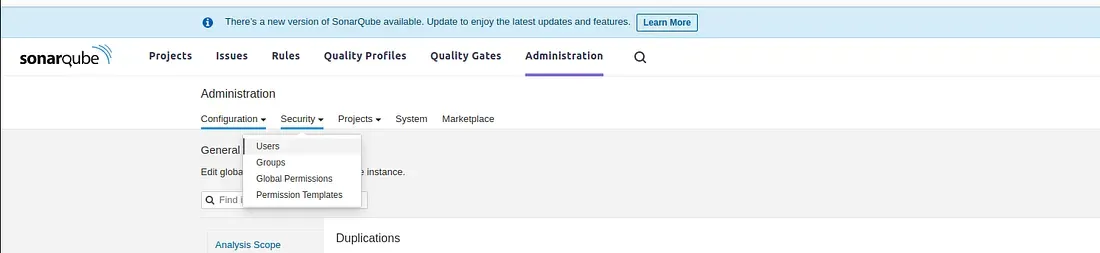
4. Create a new user if you want, I am going to use the admin user itself
5. Click on the three lines in the right most side

6. Enter a name for the token
7. Click Generate
8. Copy the generated token somewhere as we need it for later.
9. Setting up Jenkins
Now, we need to setup jenkins for sonarqube integration. For that, follow the below steps:
Installing the plugin
- Login to your jenkins server
- Go to manage jenkins -> plugins
- Search sonarqube and you will see a plugin called Sonarqube scanner
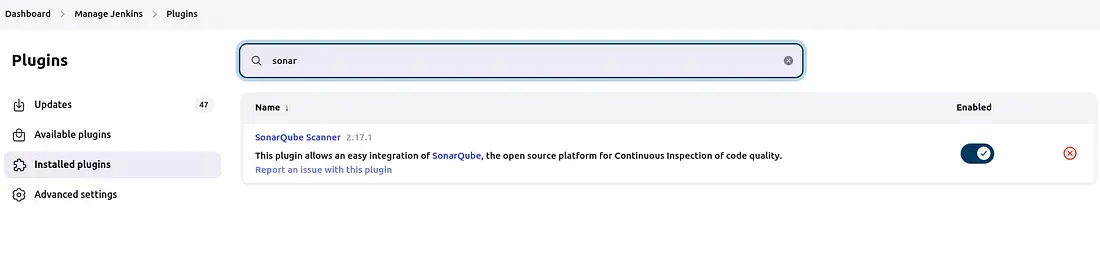
4. Install the plugin and restart jenkins.
Adding the Sonarqube token in Jenkins
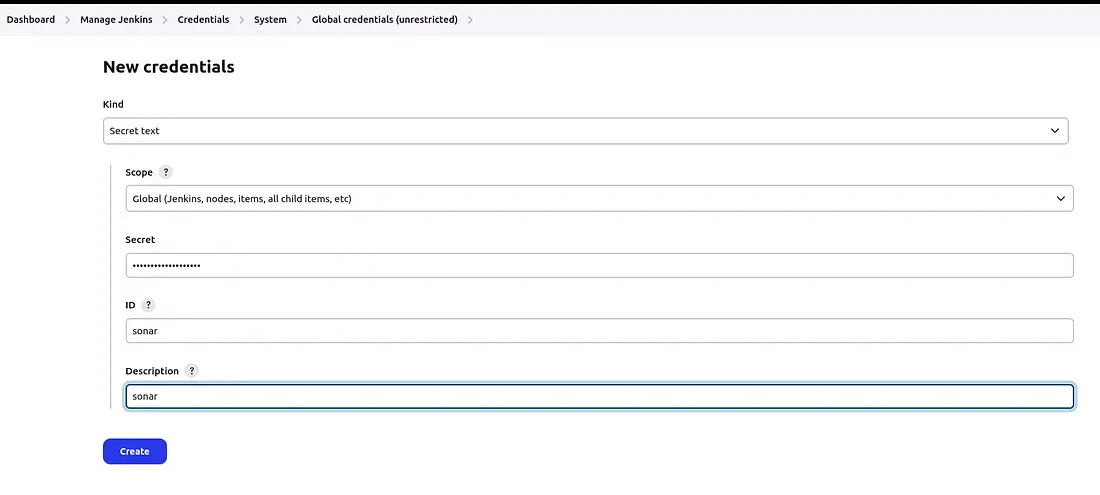
- Go to Manage Jenkins -> Credentials
- Click System -> Global Credential
- Click add credential
- Choose secret text
- Paste the token under the “secret” box
- Give the token a name under the box “ID”
- Give a description under the box “Description”
Configuring the plugin
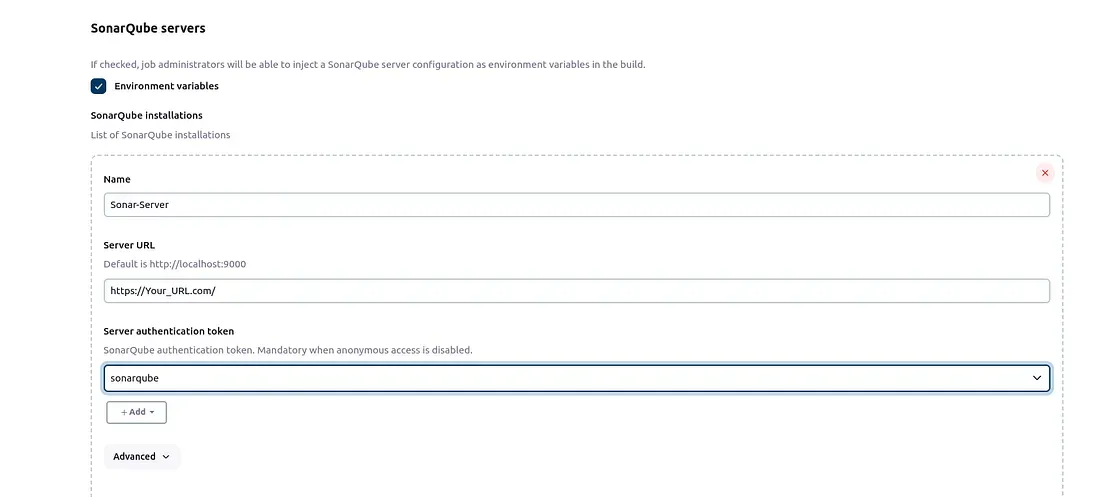
- Go to manage Jenkins -> System
- Scroll down and you will see Sonarqube servers
- Under Sonarqube servers, you will see a checkbox with name Environment variables
- Tick the Checkbox
- Give a name for the Sonarqube server under the “Name” box
- Give the URL for the Sonarqube server under the “Server URL” box
- For “Server authentication token” click the dropdown and select the name of the token which you have previously create in the above step
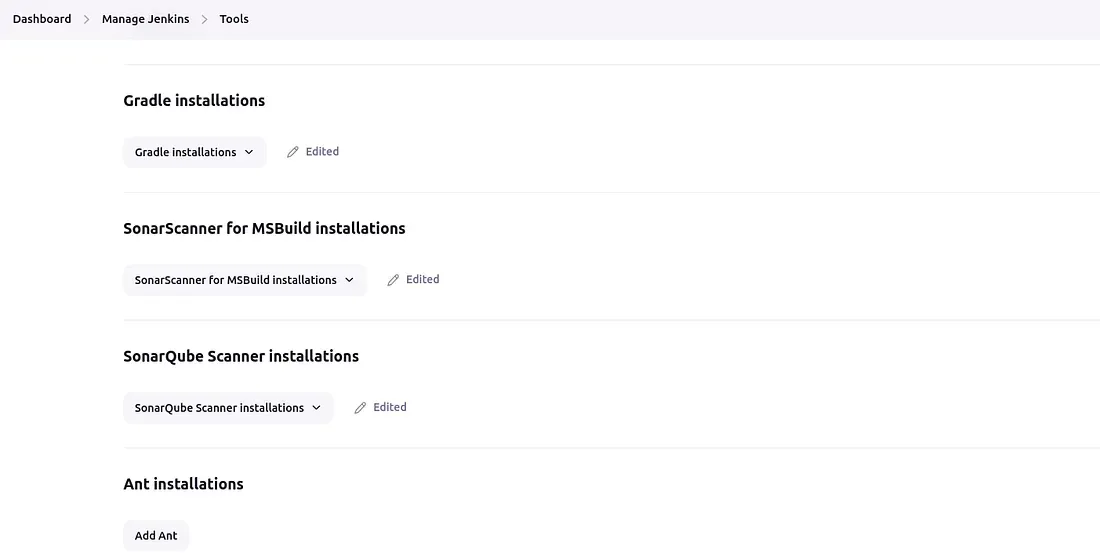
Now go to Manage Jenkins -> Tools
- Scroll down and you will see “SonarScanner for MSBuild installations”
- Click it and give a name under the box “Name”
- Click install Automatically and select install from Github and choose the latest version from Github
- Next click on “SonarQube Scanner installations”
- Give a name under the box “Name”
- Click Install automatically
- Choose “Install from Maven Central”
- Choose the latest version from dropdown.
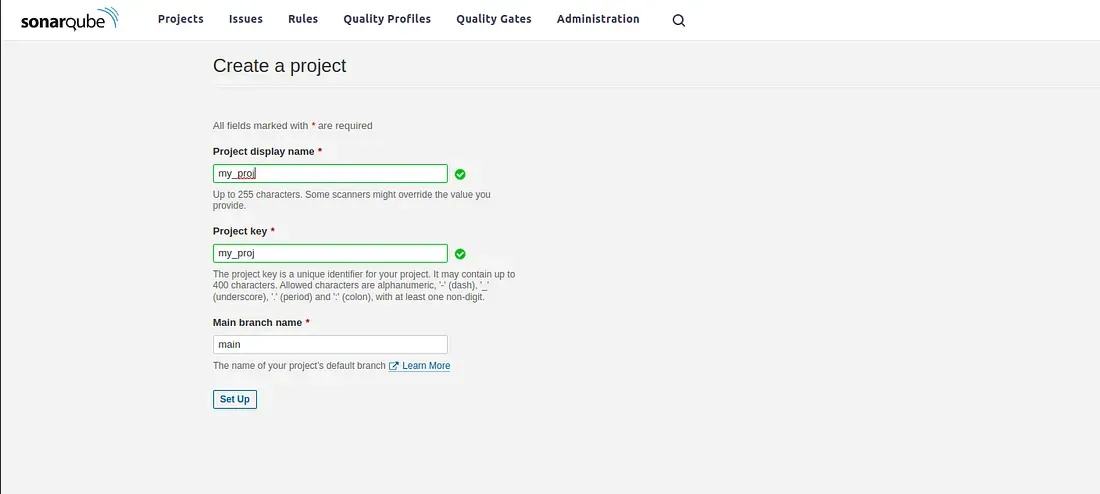
Creating a project in Sonarqube
- Login to SonarQube.
- Go to Projects.
- Click Create Project.
- Give the project’s name under “Project key” and “Display name”.
- Click Setup
Press enter or click to view image in full size
10. Integration with Jenkins Job
Here, I am going to integrate Sonarqube with a Freestyle Jenkins job. For that,
- Login to Jenkins
- Click New item
- Click Freestyle Job
- Enter the Name
- Go to add build step
- Select Execute SonarQube Scanner
- Under the build step, you will see a box with name “Analysis properties”
- You need to add, below configuration under it
sonar.projectKey=<Your project key”>
sonar.sources=< $jenkins_home/your_build_path>
sonar.qualitygate.wait=true
sonar.qualitygate.timeout=300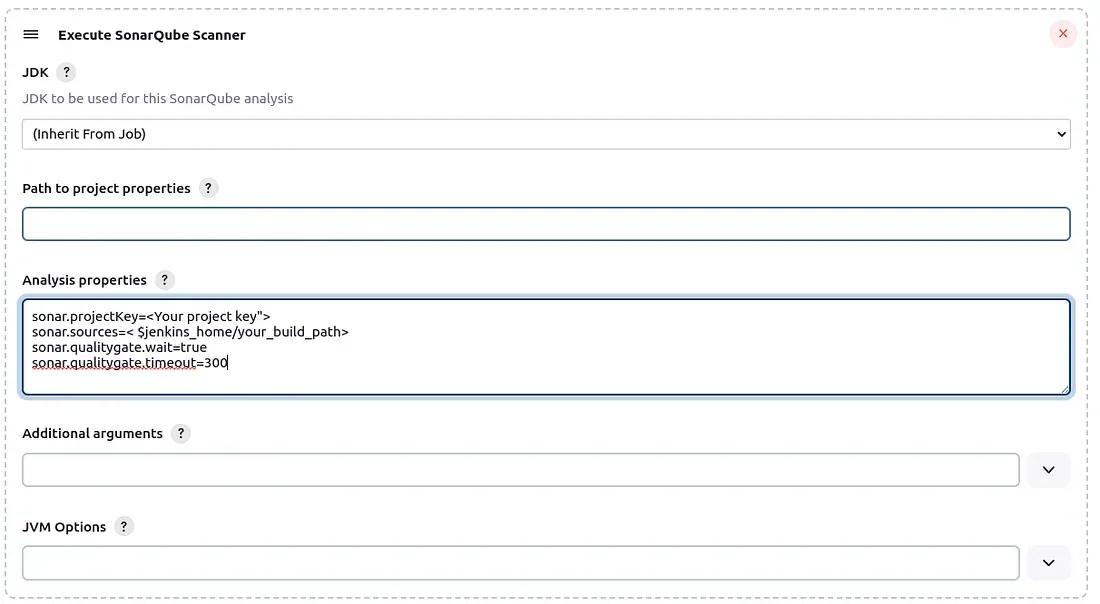
a. Project key = the name of the project that we have previously added
b. Sonar.source is the path in which the scanning should be done.
c. When we set “sonar.qualitygate.wait=true”, the build will only succeed if the quality gate is passed
d. Sonar.qualitygate.timeout is the timeout for qualitygate check
9. Now, add the next build step, that you want to add for the application to work and run the jenkins job, you can see the the sonarqube scanning your code in the console output.
The given configuration is a fresstyle job configuration. The configuration will vary as per the mode in which your applications are build.
Unify code quality and CI/CD with Sonarqube and Jenkins! This blog equips you with the knowledge to seamlessly integrate Sonarqube for static code analysis within your Jenkins pipeline. Boost your development efficiency and and streamline your DevOps workflow. implement Sonarqube with Jenkins today!