Published on: February 23, 2016 by Scott S

Scenario:
Before we proceed to the Asterisk IVR implementation we will look into configuring a hard IP phone to be used with Asterisk. I’m using the Grandstream GPX1620/1625 series IP phone to be used with Asterisk using SIP protocol. The GPX1620/1625 are IP phones that support SIP protocol.

The first thing to do is configuring the basic networking in the Phone for it to be available as a network device. The IP phones will have a RJ45 connector for it to be connected with the LAN cables. Plug in the LAN cable to the LAN port of the phone first. The automatic DHCP in the phone assigns an IP address automatically to the device. You can see the IP assigned using the “next screen” option button.
Now put in that IP address in a web browser to get the Grandstream login screen as shown below.
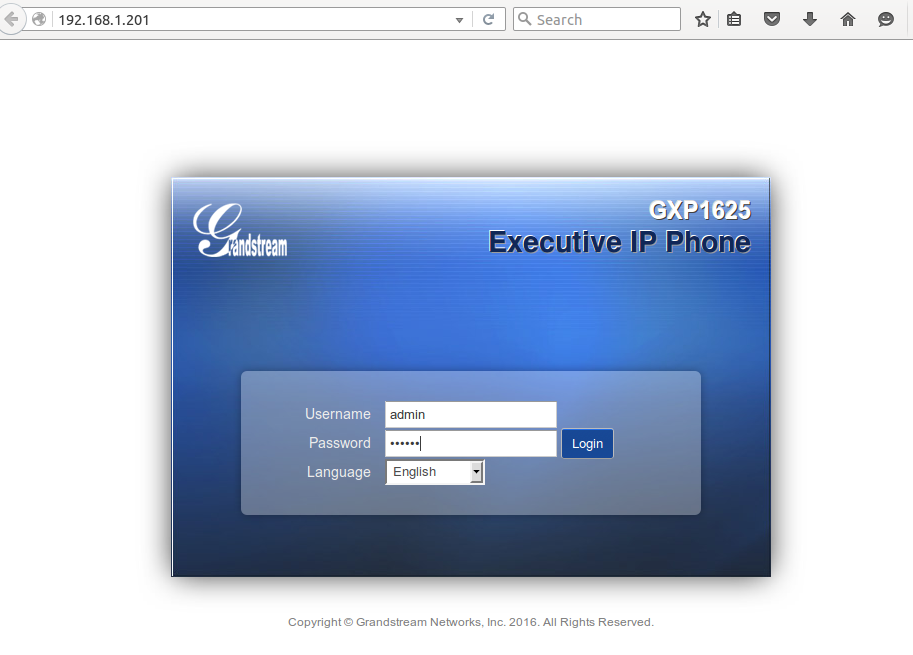
The username and password is set as “admin” by default. Login as admin.
From the admin panel click the “Network” tab and select “Basic Settings”
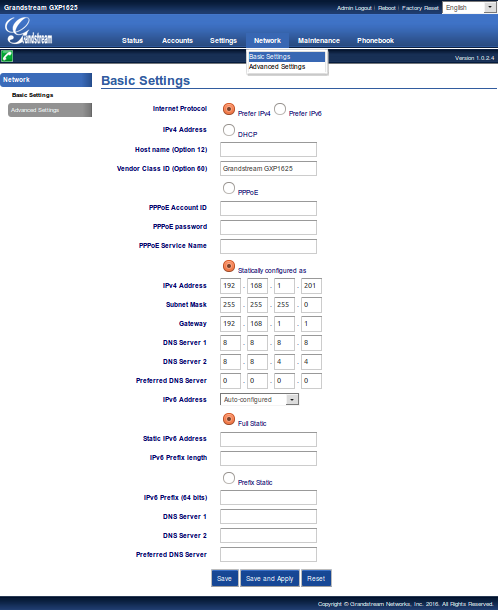
Select the radio button that says “Statically configured as” and enter the IP address, subnet, gateway and preferred DNS server. Then Click on the button at the bottom that says “Save and Apply”.
I’ve used 192.168.1.201 as the phones IP.
From now on you can access the phone web interface using the IP address you mentioned in network basic setting configuration.
The GPX 1620/1625 series IP phones support two sip accounts. From the admin main page select “General Settings” under “Account1” from the “Accounts” tab.
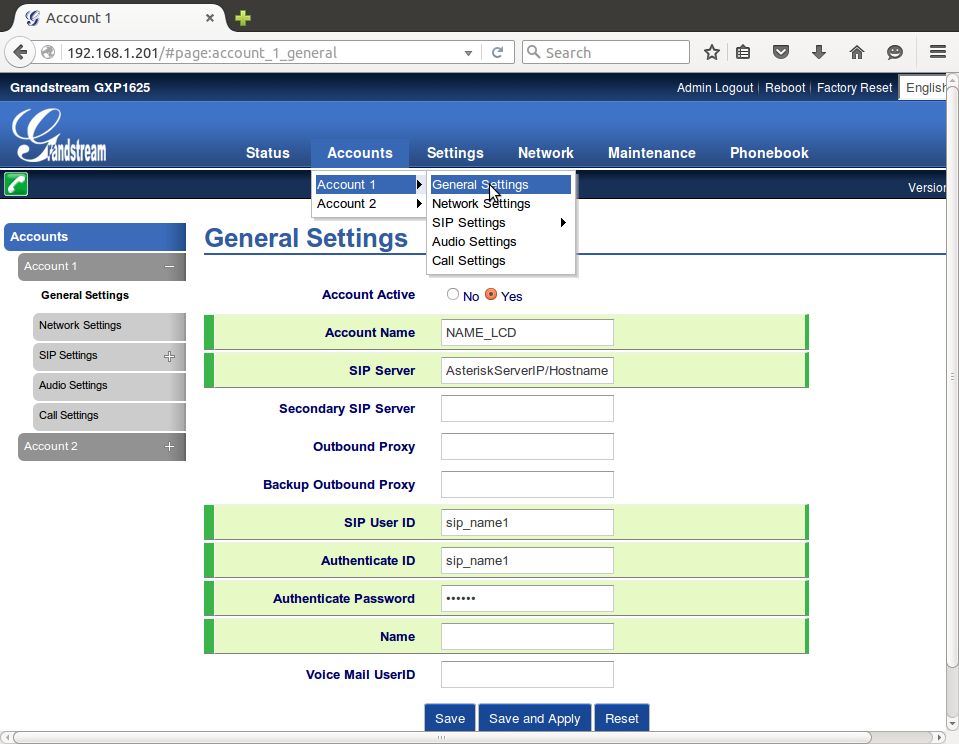
Now on the screen you enter the SIP account credentials. I’m using the same SIP accounts created in my previous blog. See screenshot above.
All the fields are not mandatory. To get the basic peer to peer connection the below mentioned fields are mandatory.
Account Name : The name associated with each account to be displayed on the LCD
SIP Server : The URL or IP address of the Asterisk server.
SIP User ID : User account information configured in sip.conf file in Asterisk server(sip_name1)
Authenticate ID : Same as User ID
Authenticate Password : The sip account password required for the phone to authenticate with the SIP account sip_name1
Once done click the “Save and Apply ” button to apply the changes.
Now the IP phone GPX1625 is ready and registered with our Asterix Server.
To verify the registration you can use the “sip show peers” command in the Asterisk CLI. It should show the peer registered as shown below:
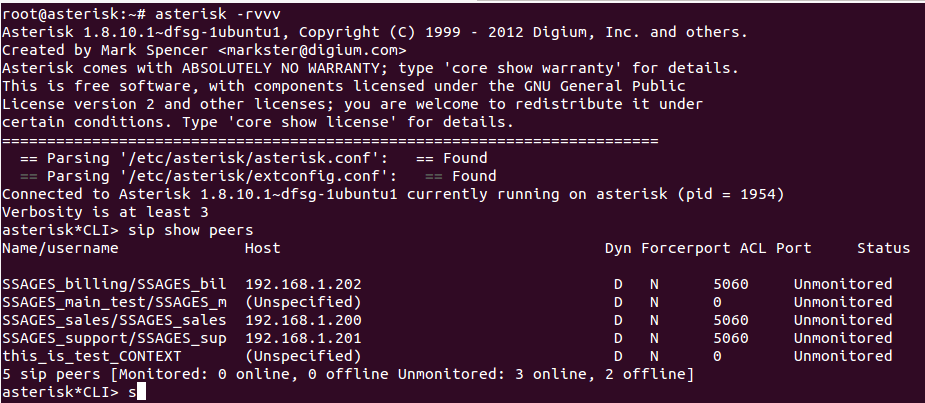
The screen shot shown above has more than one sip clients registered, you should only have 1 at this stage.
Similarly configure other IP phones with the other sip accounts, and check the peer status using the Asterisk CLI. Once this is done you can use the IP phones to use Asterisk as the VoIP sever and enable VoIP communication.
An IVR is a technology that provide pre-recorded voice prompts and menus to the caller and touch tones from the telephone for input from the user. It helps to route calls to appropriate recipient. For example if you have a technical query, you need to be connected with a technical guy rather than a sales/billing guy. So routing the call based on the input from the user is done by IVR menus.
IVR Menu Implementation
Lets assume the Asterisk server already configured having three sip accounts named sip1, sip2 and sip3. These configurations are done in the sip.conf file as mentioned in my previous blog. Once all the sip accounts are configured, we configure three IP phones to be used for each sip account.
Lets take a real scenario where an organization has three departments. Technical, Billing and Sales. So a person calling the organization should be able to choose which department he connects.
The example IVR architecture is shown below:
For example: Thank you for calling <Company Name>
Press 1 for technical support
press 2 for billing Query
press 3 for sales Query
Press # to repeat the menu
Voice Recording For Menu
To implement this we need to have different voice recordings for the menu first. All the sound files used in Asterisk are of sln format. You can create voice menus by trying any online text to speech converter like http://www.fromtexttospeech.com . But here we get the audio files in .mp3 format. We first convert the .mp3 file to .wav format using any online audio converters. The one I used is http://audio.online-convert.com/convert-to-wav .
Once the .wav file is got we convert it to .sln using SOX command as follows.
root@asterisk:~# sox inputwavefile.wav -t raw -r 8000 -s -2 -c 1 outputfilename.sln
Once the .sln file is got, place it in /var/lib/asterisk/sounds directory. So all the sound files used in Asterisk should be placed under the mentioned directory.
The voice clips I use are: The below mentioned are file names.
intro_welcome.sln – The message that says, “Thank you for calling <Company Name>”
menu_intro.sln – The sound file that says our menu(press1 for technical, press2 for billing, press 3 for sales and press # for repeating the menu)
invalid_option.sln – Sound file that says “you have entered an invalid option, please enter 1, 2, 3 or #”
no_input.sln – Sound file that says “‘You have not provided any input,please enter 1, 2, 3 or # “
no_input_final.sln- Sound file that says “Since we have not received any input from you, we are forced to disconnect the call. Thank you for calling, have a nice day”
support_intro.sln – Sound file that says “Please wait while your call is being answered by our technical support executive”
billing_intro.sln – Sound file that says “Please wait while your call is being answered by our billing department executive”
sales_intro.sln – Sound file that says “Please wait while your call is being answered by our sales executive”
Configure the sip accounts using the /etc/asterisk/sip.conf file as shown below for three departments.
[general]
transport=udp
[this_context]
type=friend
host=dynamic
context=this_context
disallow=all
allow=ulaw
[support](this_context) //SIP account for support
secret=your_pass_for_sipaccount1
[billing](this_context) //SIP account for billing
secret=your_pass_for_sipaccount2
[sales](this_context) //SIP account for sales
secret=your_pass_for_sipaccount3
All the routing is done in the /etc/asterisk/extensions.conf file. Below is the extensions.conf file configured to present the example IVR.
[this_context]
exten=>100,1,Noop //no operation is done, control is passed to next priority
exten=>100,2,Answer() // Answers the call
exten=>100,3,Playback(/var/lib/asterisk/sounds/intro_welcome)//Plays the intro_welcome audio file
exten=>100,4,Set(loop=2) // set loop count to 2
exten=>100,5(loop),Noop() // No operation, control passed
exten=>100,6,Background(/var/lib/asterisk/sounds/menu_intro) //plays the menu_intro audio file and at the same time expects input from user
exten=>100,7,WaitExten(10) //waits 10 seconds for receiving input
exten=>100,8,Background(/var/lib/asterisk/sounds/no_input) //plays no_input file and expects input from user
exten=>100,9,Set(loop=$[ ${loop} – 1 ]) //decrement loop count by 1
exten=>100,10,GotoIf($[ ${loop} > 0 ]?loop) //checks if loop count is zero, if not control goes to the beginning of the loop else exits .
exten=>100,11,WaitExten(3) //waits 3 seconds
exten=>100,12,Playback(/var/lib/asterisk/sounds/no_input_final) //plays no_input_final audio and passes the control to next priority
exten=>100,13,Hangup() // ends the call
exten=>1,1,Noop //no operation is done, control is passed to next priority
exten=>1,n,Answer //Answers the call
exten=>1,n,Playback(/var/lib/asterisk/sounds/support_intro) // plays support_intro and passes control to next priority
exten=>1,n,Dial(SIP/support) //Dial IP phone configured for SIP account support
exten=>2,1,Noop //no operation is done, control is passed to next priority
exten=>2,n,Answer //Answers the call
exten=>2,n,Playback(/var/lib/asterisk/sounds/sales_intro) // plays sales_intro and passes control to next priority
exten=>2,n,Dial(SIP/sales) //Dial IP phone configured for SIP account sales
exten=>3,1,Noop //no operation is done, control is passed to next priority
exten=>3,n,Answer //Answers the call
exten=>3,n,Playback(/var/lib/asterisk/sounds/billing_intro) // plays billing_intro and passes control to next priority
exten=>3,n,Dial(SIP/billing) //Dial IP phone configured for SIP account billing
exten=>#,1,Goto(this_CONTEXT,100,6) // if # is pressed goto context [this_context] and pass control to extension 100
exten => i,1,Playback(/var/lib/asterisk/sounds/invalid_option) //Plays invalid_option file and passes the control below
exten => i,n,Goto(this_CONTEXT,100,6) //pass control to context [this_context] and pass control to extension 100
Dialplan Commands used
From any IP phone configured with asterisk, dial 100 to reach the IVR menu. When 100 is dialed, Asterisk answers the call and provides the IVR to the caller.
![]()
Category : Howtos, Linux

Scott follows his heart and enjoys design and implementation of advanced, sophisticated enterprise solutions. His never ending passion towards technological advancements, unyielding affinity to perfection and excitement in exploration of new areas, helps him to be on the top of everything he is involved with. This amateur bike stunting expert probably loves cars and bikes much more than his family. He currently spearheads the Enterprise Solutions and Infrastructure Consultancy wing of SupportSages.


Add new commentSIGN IN