Published on: April 4, 2019 by Albert Reilly
Scenario:
CONFIGURING WORDPRESS CONTENTS TO LOAD FROM AWS CDN
You may have now setup a LAMP server and may have installed WordPress by following the previous parts of the documentation. Now we will configure WordPress contents to load from AWS CDN. The steps involved are.
Installing W3 Total Cache Plugin.
W3 Total Cache plugin will help to upload contents to our S3 bucket from where they are loaded.
$ cd /var/www/site2/public_html/wp-content/plugins
$ wget https://downloads.wordpress.org/plugin/w3-total-cache.0.9.7.2.zip
$ unzip w3-total-cache.0.9.7.2.zip
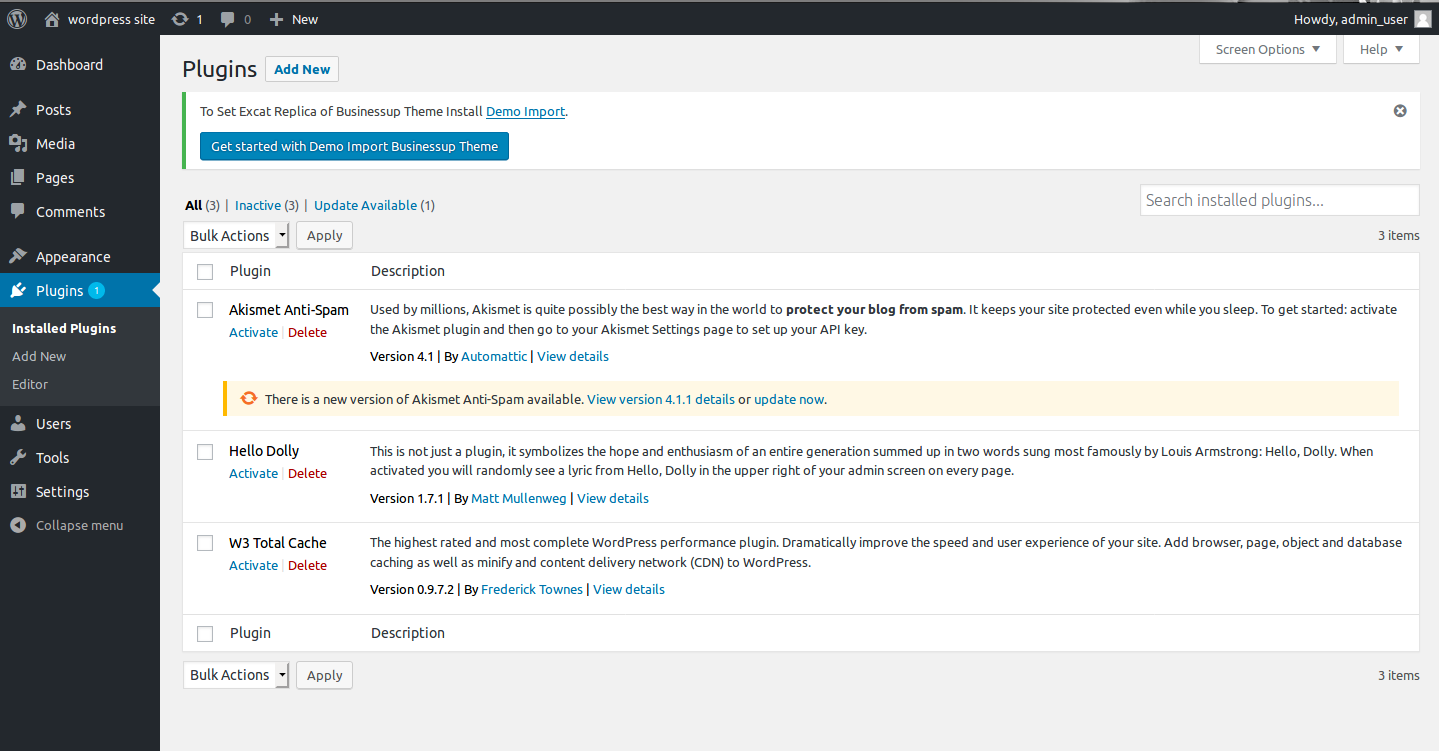
Now, go to the dashboard and select plugins from the left. There will be W3 Total Cache and click on activate.
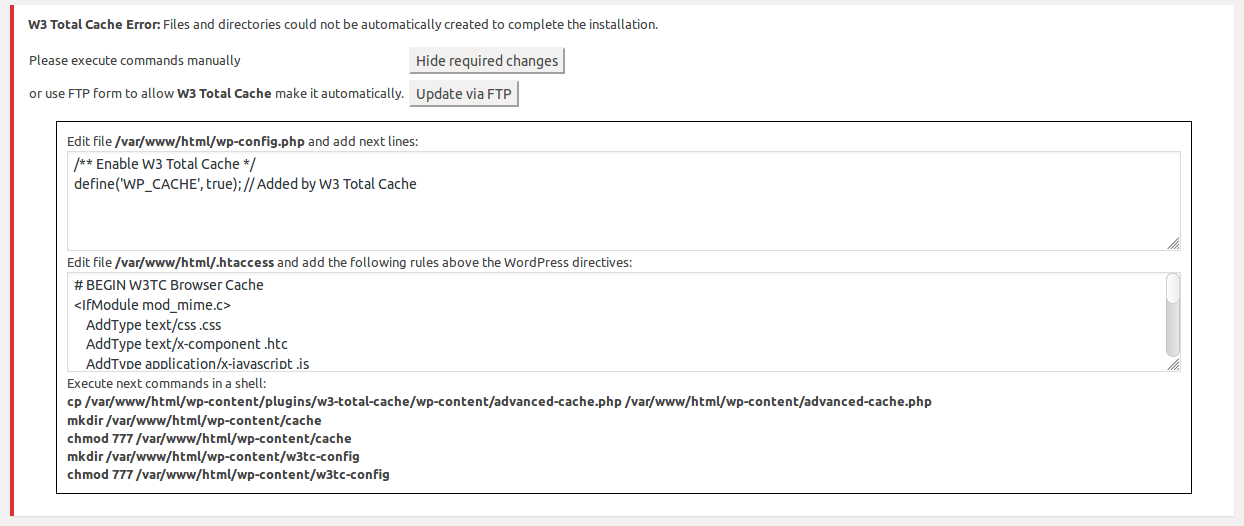
You may see the error as below. Then, click on view required changes and make changes accordingly. Refresh the page to check if the issue is resolved.
Identify & Access Management.
You can create multiple groups and each group can have multiple users associated with it using the IAM console. Creating users will help to manage rights to be performed within groups.
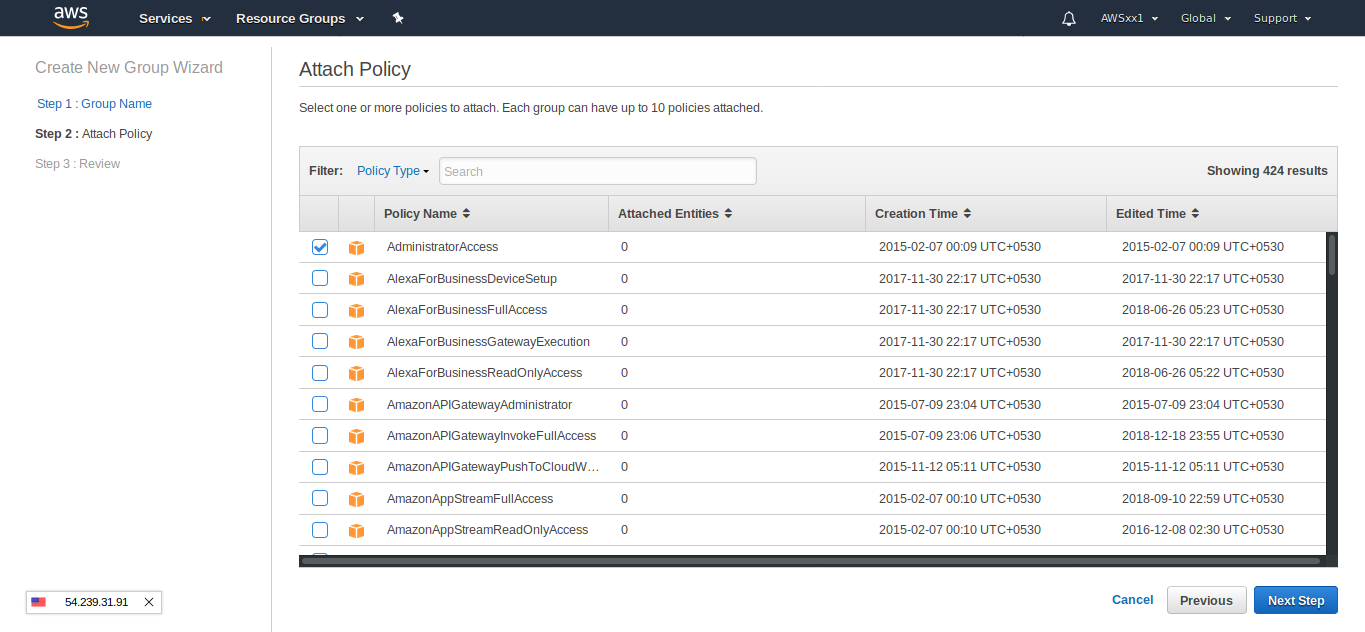
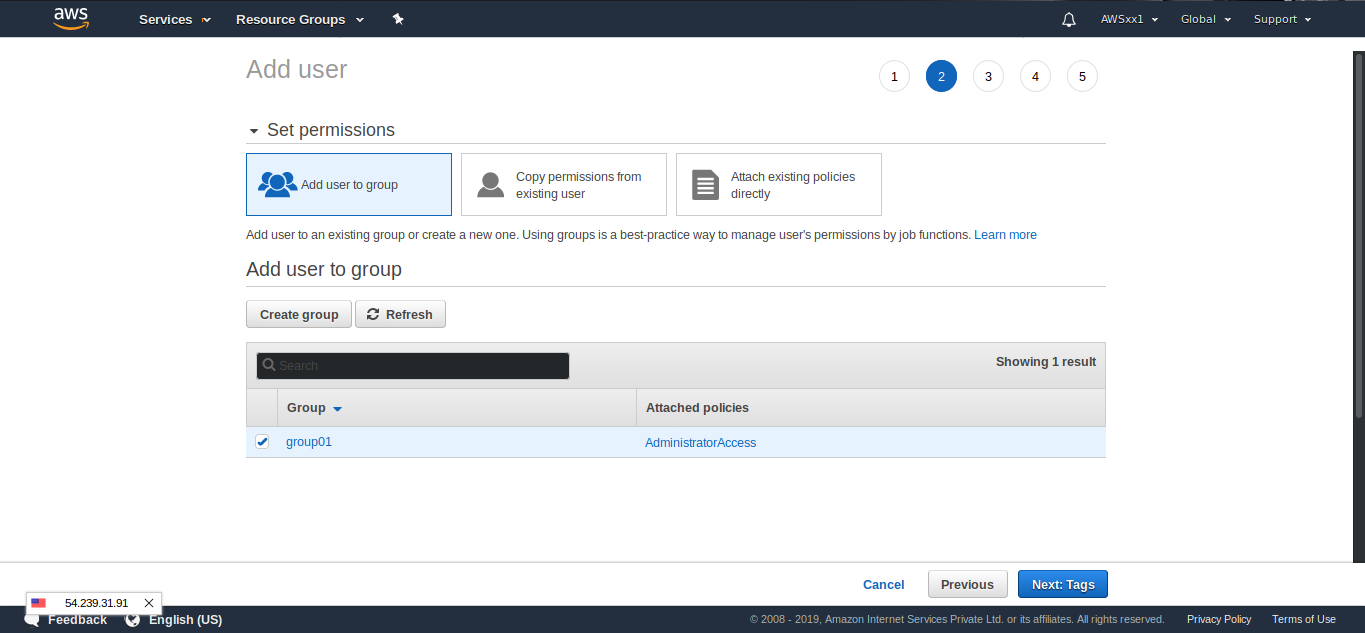
From the Identity & Access Management console (from services), create a new group by clicking on groups in the left. Type the group name and click on the next step button. Give the group Administrator Access by checking it in the Attach policy step as in the below figure. Click on next step. Review the information and click on Create Group.
Now, we need to create an individual User ID that we can assign to that group. Select User in the left sidebar. Select Add User button at the top of the page. Enter a username and be sure “Programmatic Access” is ticked.
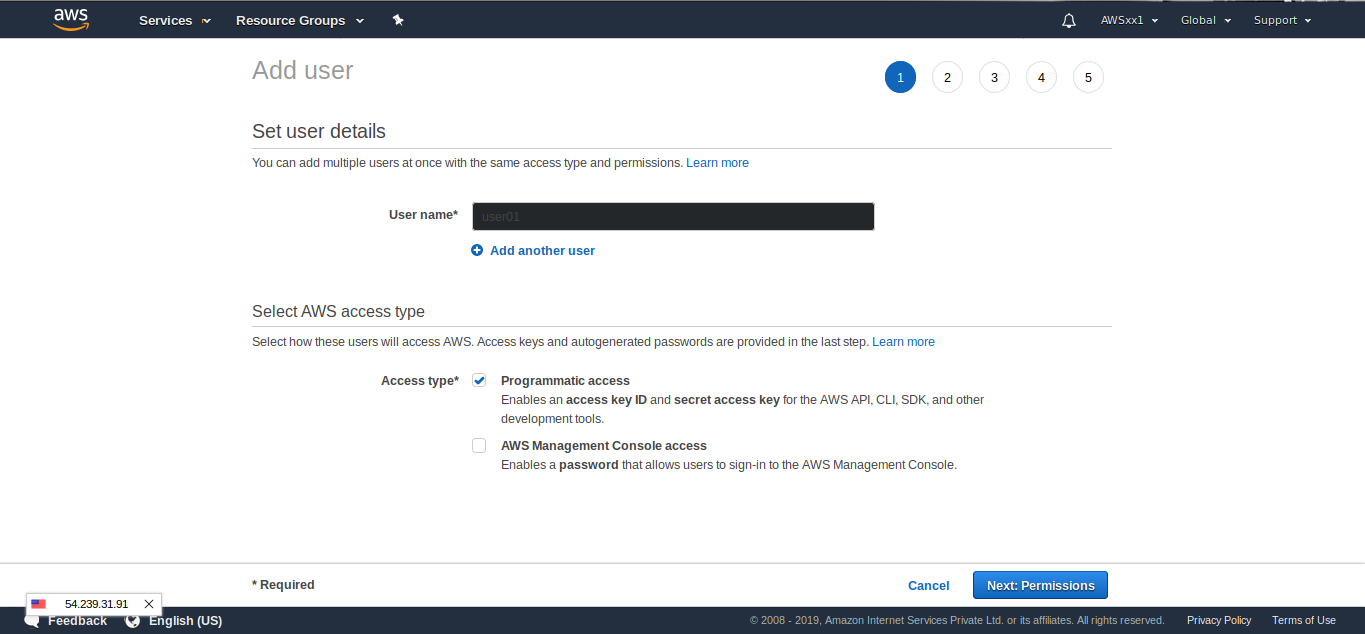
Click the Next:Permissions button at the bottom to move to the next page. From the next page, click on the Add User to Group box. Tick the box for the group you want to give the user access to and click the Next:Tags Button at the bottom. Add a required key if needed and click next to review.
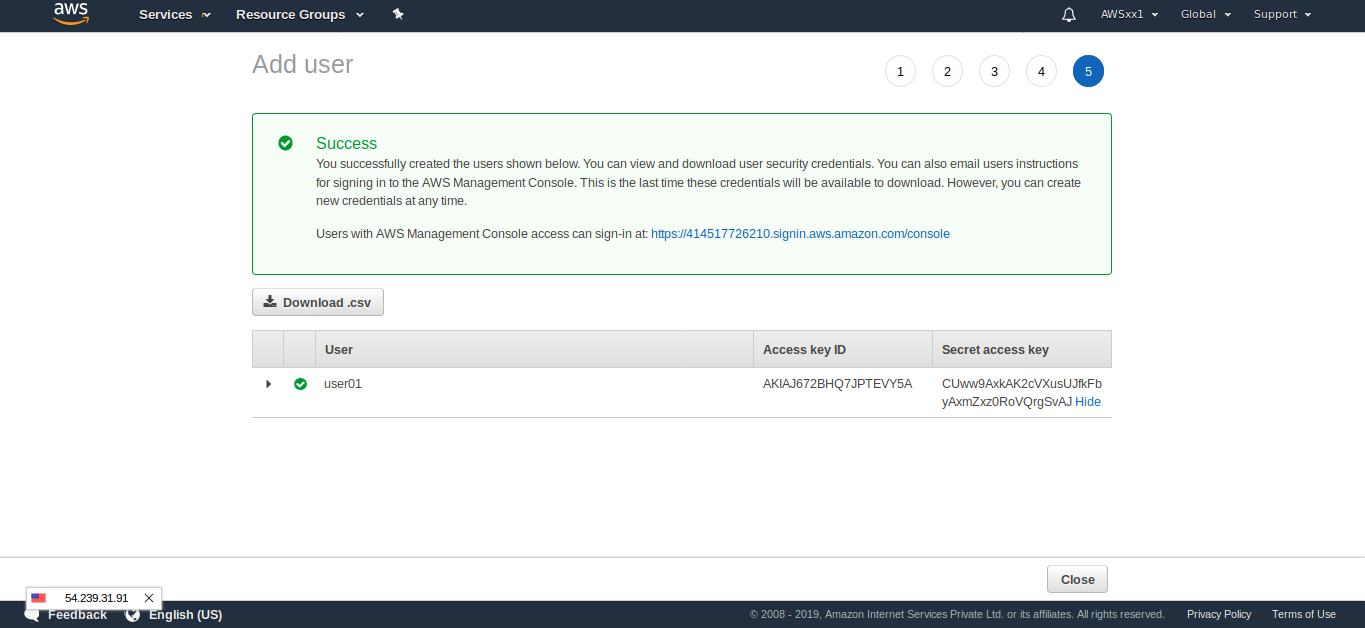
Click on Create User. Be sure to press the Download .CSV button to download your new security credentials. You may not be able to do this later and these details need to be entered in the WordPress.
Configuring the Plugin.
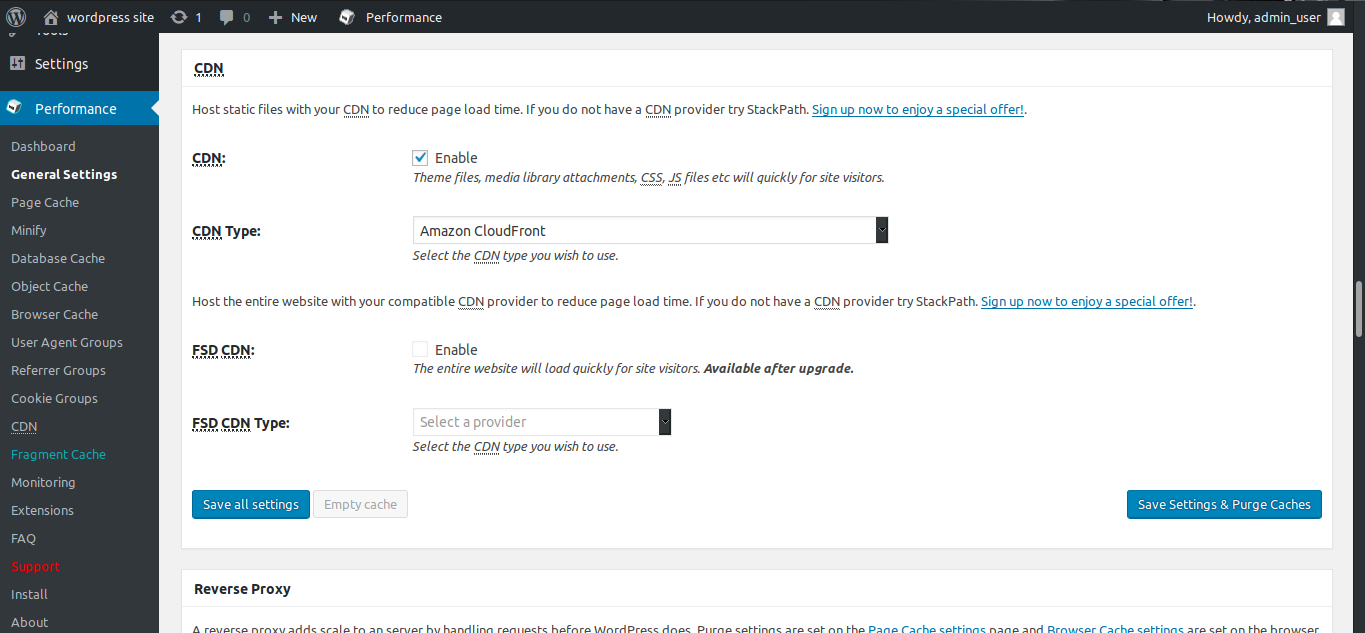
Now we will move on to set things up from the WordPress admin side. Click on settings under the W3 Total Cache plugin. Alternatively, go to performance from the left panel, and click on general settings. Now scroll down to CDN part and click enable. For CDN type, we will select Amazon CloudFront.
You may get confused with Origin Pull and Origin Push. In the first method, CloudFront handles the pulling of information from your origin server as needed and there is no need to upload files to the S3. Simply create your post, add images, and publish. On the other hand, the other option requires you to upload your files manually. So, every time you create a new post with images, you have to manually send that information to the Cloud. W3 Total Cache gives you the functionality to do this and we will look into it later.
Origin pull method.
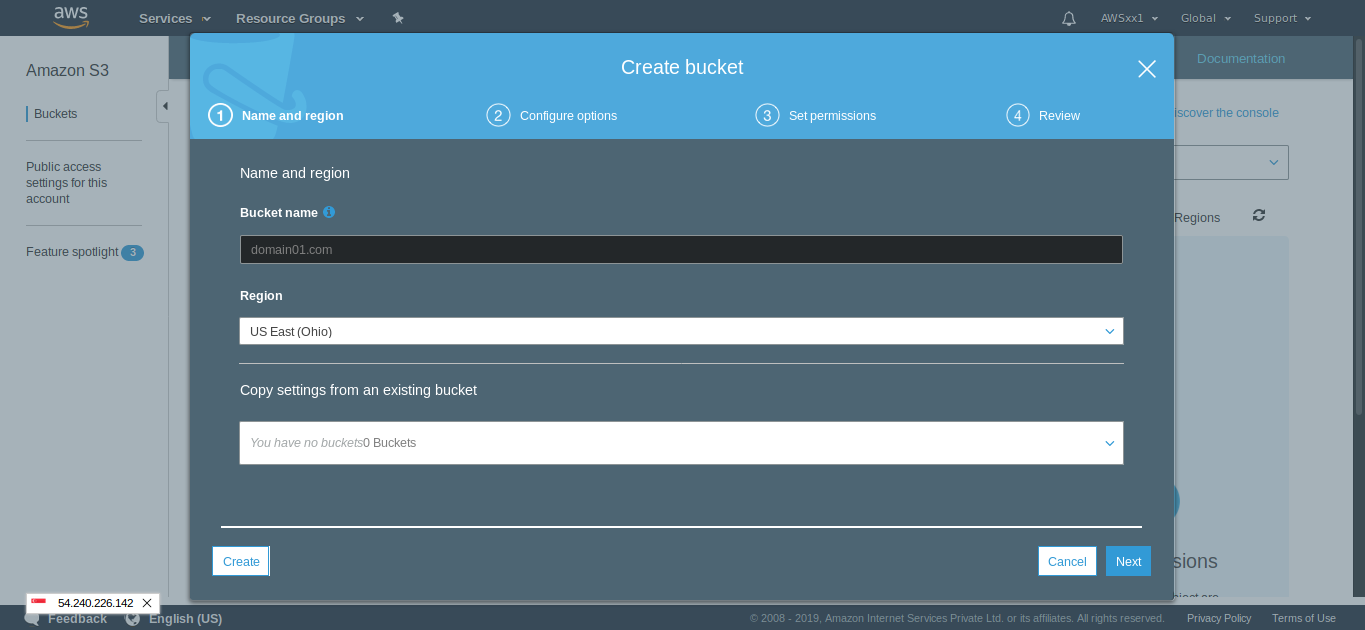
For this, first create a S3 bucket with your domain name by going to S3 under services. Simply click on next keeping the default values.
Now at the WordPress end, select the CDN type as Amazon CloudFront under origin Pull/Mirror.
Click on save all settings. Now you will see some errors on the page requiring you to edit some things. We may need to add some lines as said in the htaccess.

Click on Specify it here, and you will be moved to the CDN configuration page. Now open the CSV file you have downloaded while creating the user.
Copy the access key from that file and paste it in the Access Key ID field, similarly, enter Secret Key.

The Origin Field will have defaulted to the URL of your site and is going to become the name of your Distribution in CloudFront. Now press the Create Distribution button next to that name.
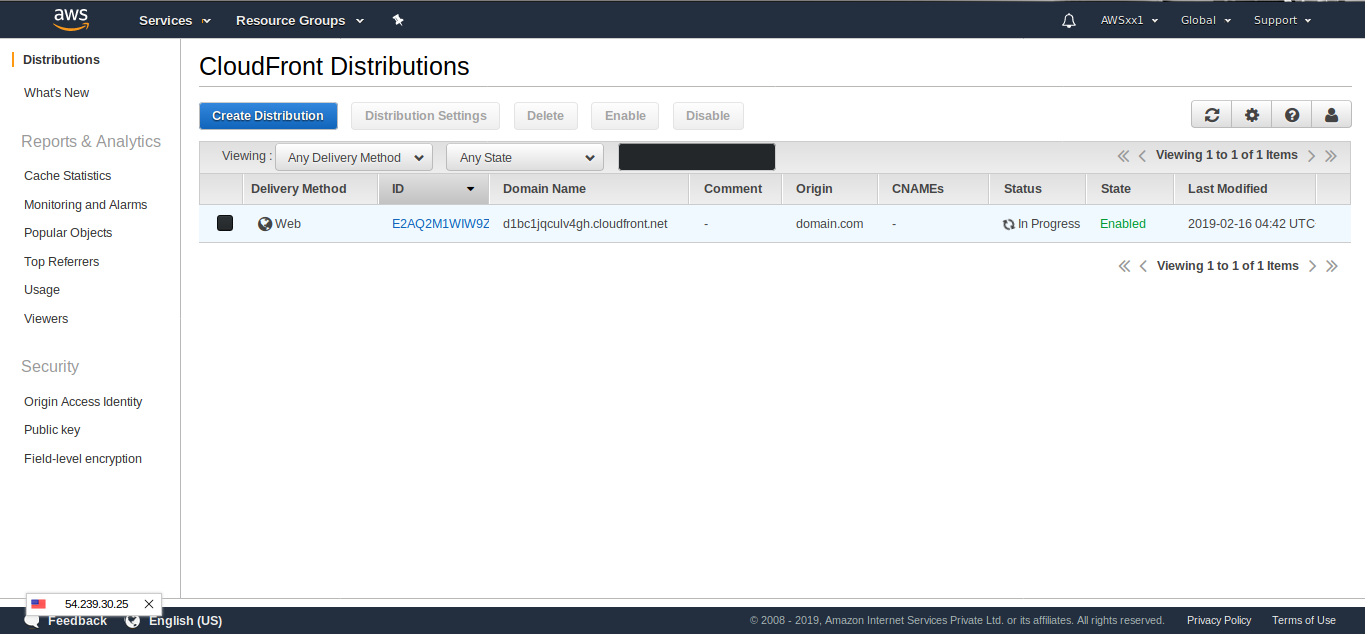
A new CloudFront distribution will be created. Now, go to the CloudFront page and select the first part of the domain name of our distribution (d1bc1jqculv4gh as in the figure below) to the field Replace site’s hostname with. Optionally, you can add a CNAME to make the CDN URL look neat and short.
The distribution will be in progress status and will be changed to Deployed after some time. The setup is now complete.
Origin push method.
This method is similar to the pull. At the WordPress end, select the CDN type as Amazon CloudFront under Origin Push.
Click on save all settings. Now you will see some errors on the page requiring you to edit some things.
![]()
Click on Specify it here, and you will be moved to the CDN configuration page. Now open the CSV file you have downloaded while creating the user.
Copy the access key from that file and paste it in the Access Key ID field, similarly, enter Secret Key.
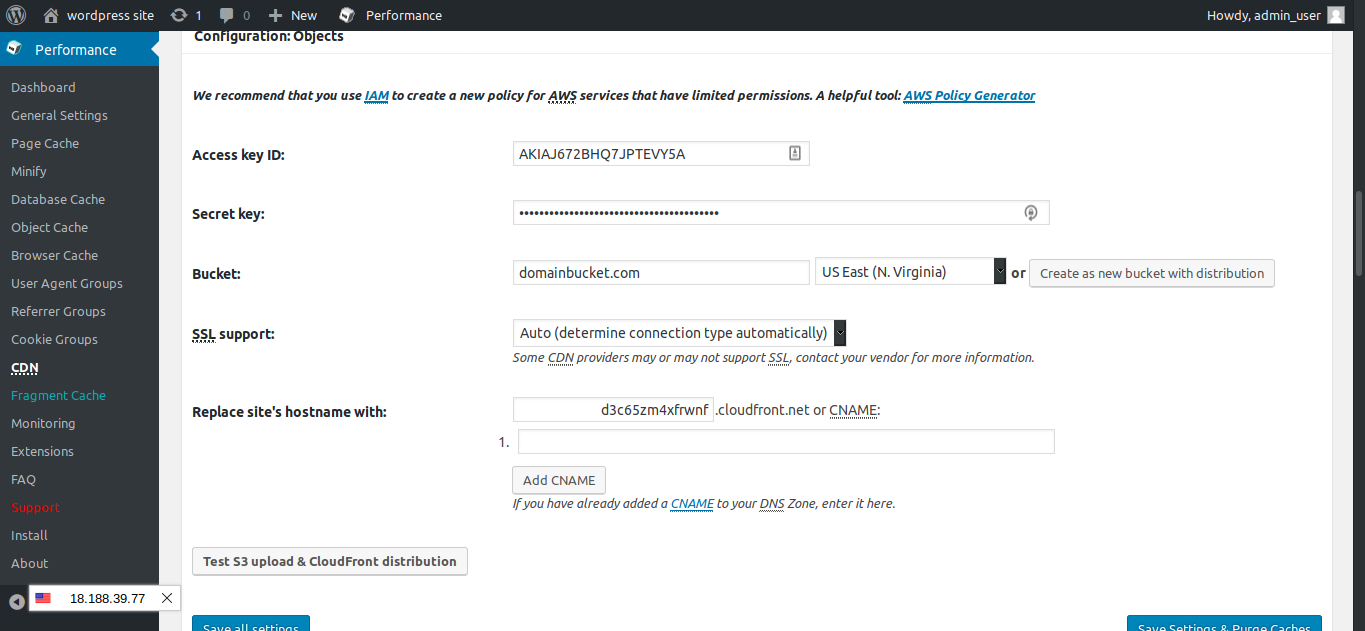
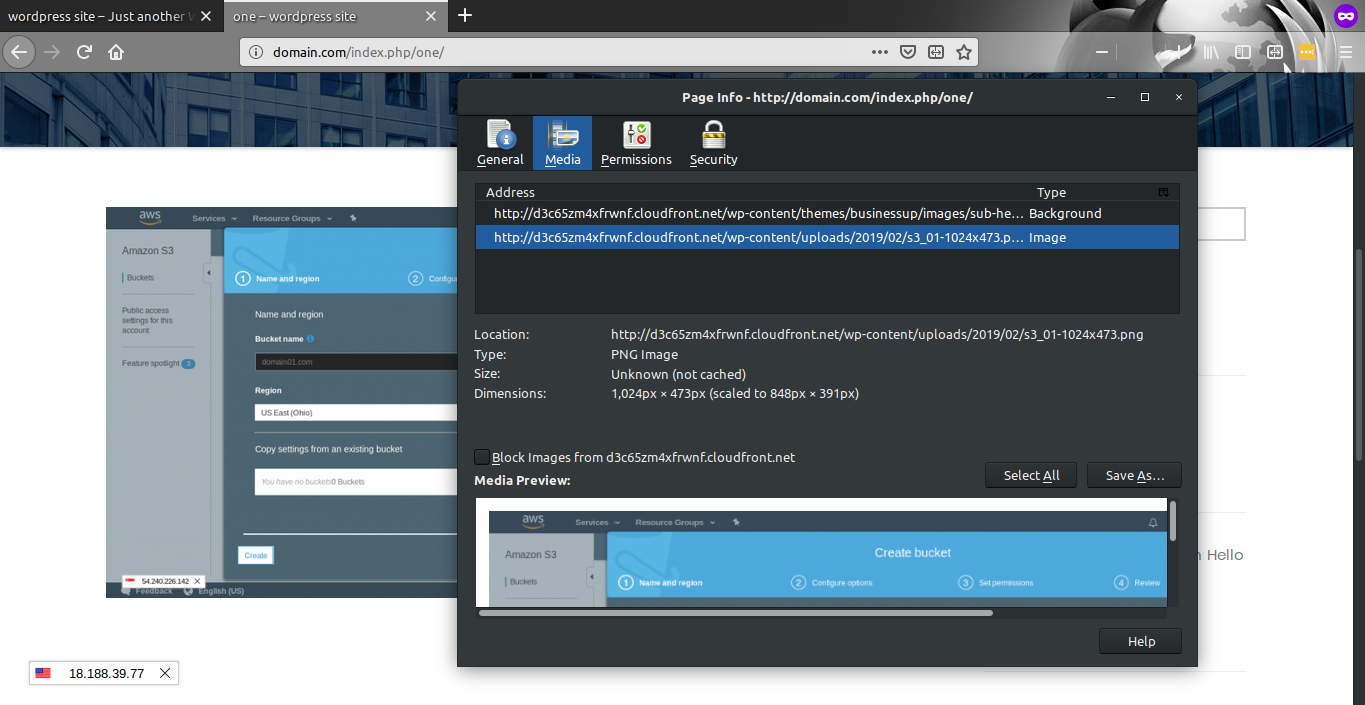
You can enter an existing bucket name or create a new one. We will create a new one by entering a bucket name and clicking Create as new bucket with distribution. A new CloudFront distribution will be created. Now, go to the CloudFront page and select the first part of the domain name of our distribution (d3c65zm4xfrwnf as in the figure) to the field Replace site’s hostname with. Optionally, you can add a CNAME to make the CDN URL look neat and short. Click on Test S3 upload & CloudFront distribution.
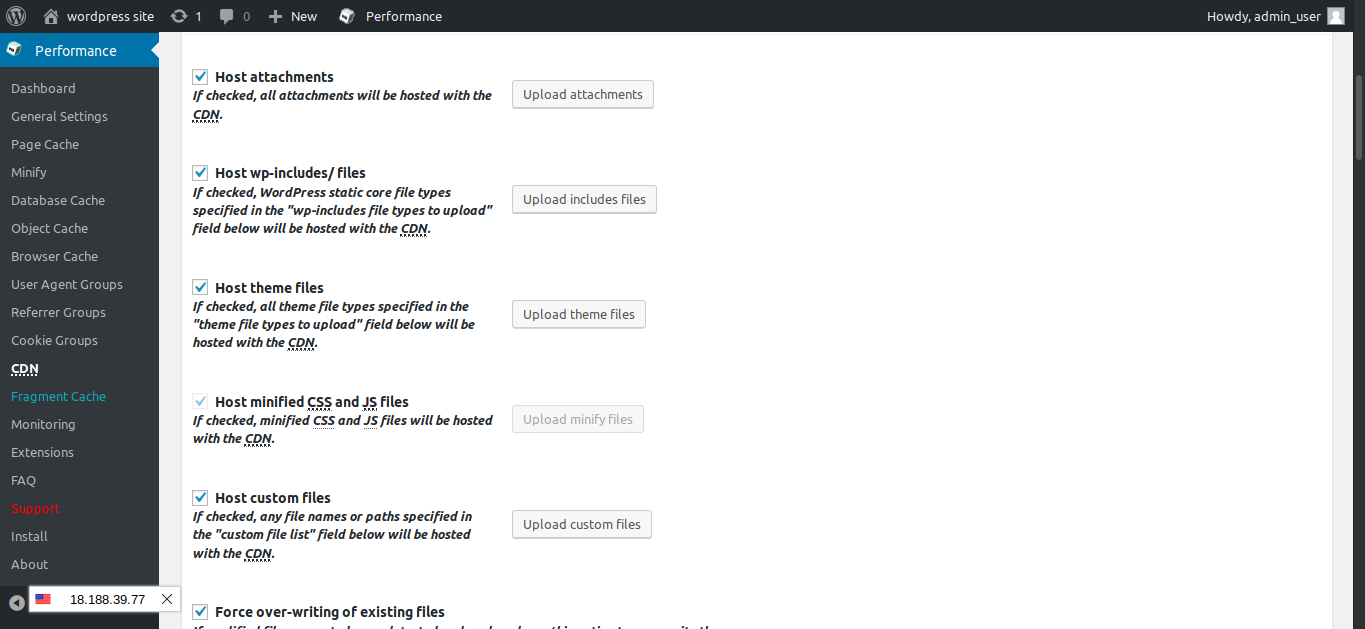
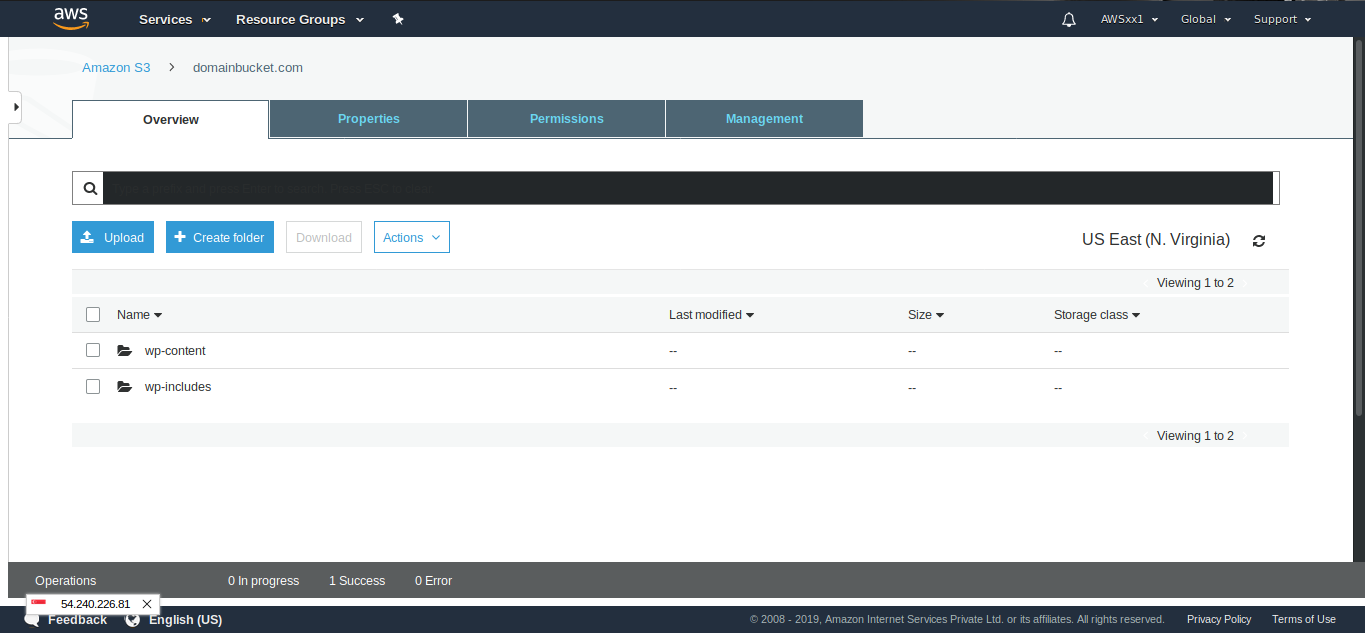
After the distribution status changes to deployed, click on CDN in the left panel under performance. You will see a page as below. Now we will need to manually upload the files to the S3 by clicking the Upload buttons.
You will see a popup to import the files. Click on start and it will be completed soon.

Now, you will see that the S3 contains the website static files we have uploaded.
You can export changes files automatically by scrolling down and ticking the option export changed files automatically. In this way, new contents will be added to CDN in a regular sync interval.
Testing:
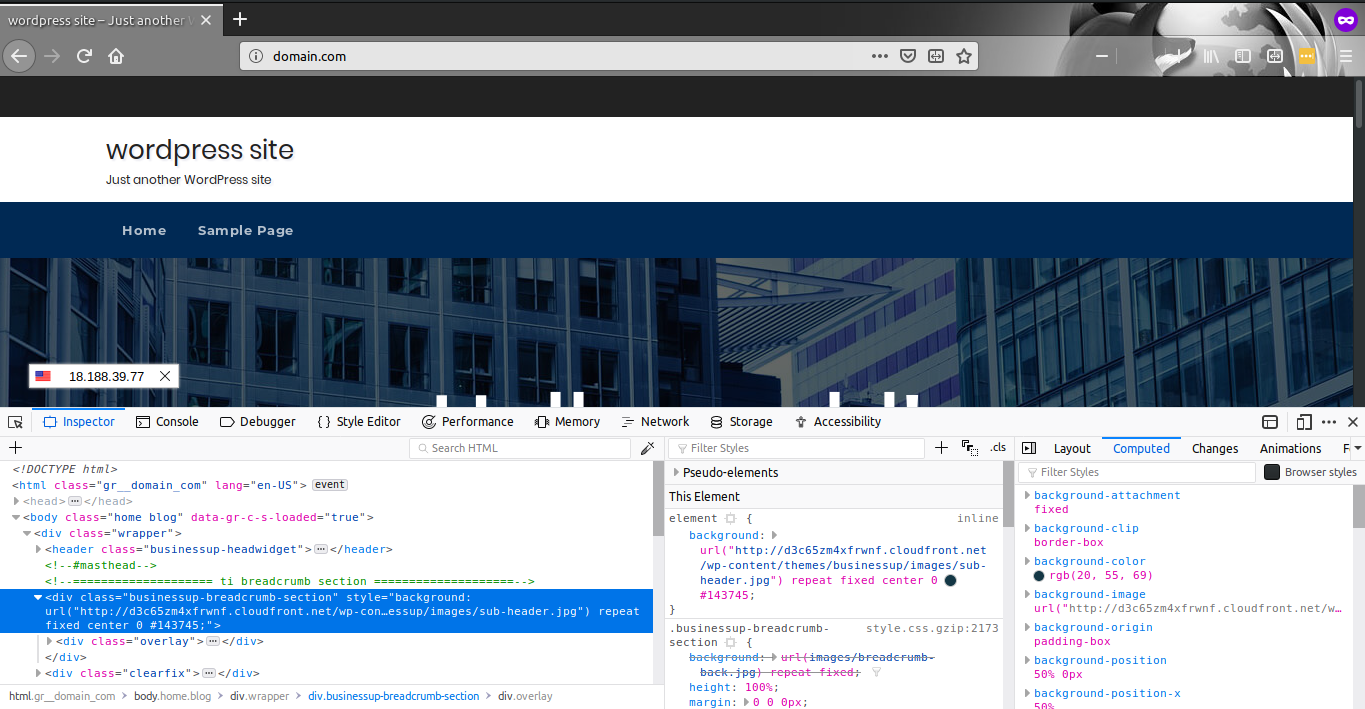
Now comes the easiest part, testing the site. Load the site in a browser and click on F12 to open the console and inspect the elements. You will see the images and theme files retrieved from CDN.
You have now configures your WordPress site to be loaded from Amazon CloudFront and S3.
Note:
If some images are not loaded on the site, right click at that place and select inspect. In the console, you may be able to see the error or issue. If it is a 404 not found error, try uploading the file manually or in the origin push method, retry uploading from the WordPress admin. For certain themes, you may be able to see CORS error (No ‘Access-Control-Allow-Origin’ header is present on the requested resource).
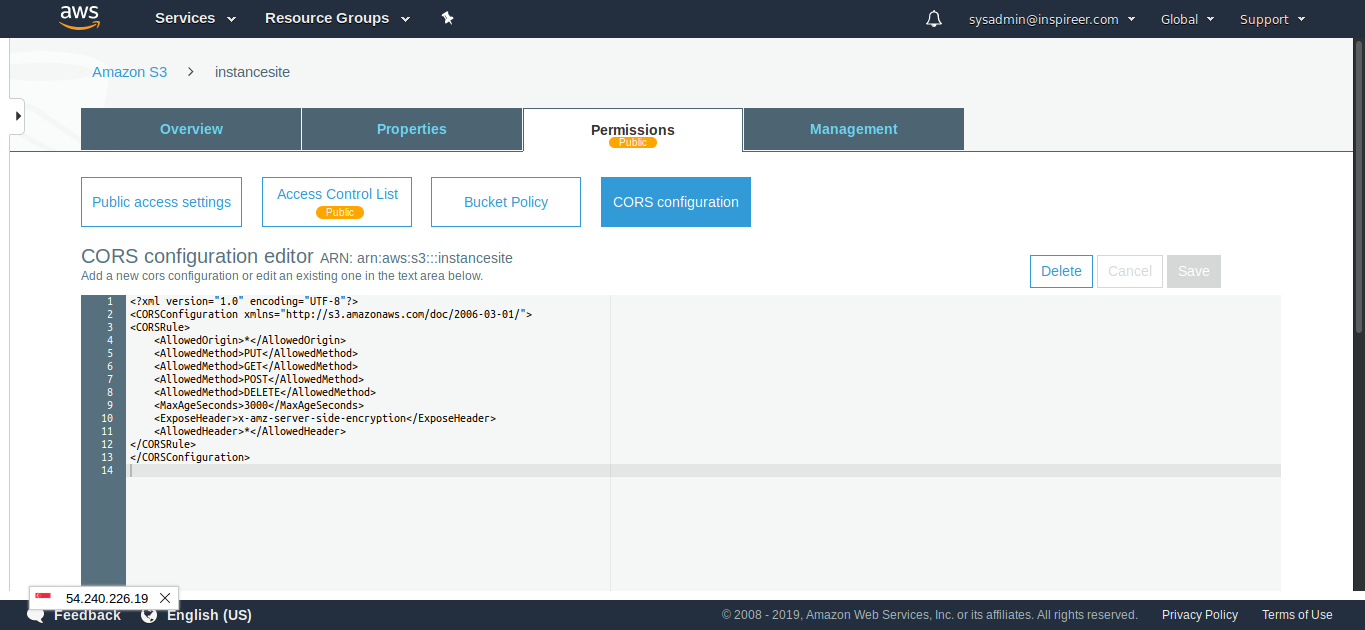
In that case, we will need to change some options and may need to add something on our AWS services. First, we need to make sure the origin’s cross-origin sharing (CORS) policy allows the origin to return the “Access-Control-Allow-Origin” header. Go to the S3 and select the permissions tab. Click on the CORS configuration and add the below lines there.
<?xml version="1.0" encoding="UTF-8"?>

<CORSConfiguration xmlns="http://s3.amazonaws.com/doc/2006-03-01/">

<CORSRule>

<AllowedOrigin>*</AllowedOrigin>

<AllowedMethod>GET</AllowedMethod>

<AllowedMethod>HEAD</AllowedMethod>
 <AllowedMethod>PUT</AllowedMethod>

 <AllowedMethod>POST</AllowedMethod>

 <AllowedMethod>DELETE</AllowedMethod>

<MaxAgeSeconds>3000</MaxAgeSeconds>

<AllowedHeader>Authorization</AllowedHeader>

 </CORSRule>

</CORSConfiguration>
Next, make sure the CloudFront distribution’s cache behaviour allows the OPTIONS method for HTTP requests.
1. Open your distribution from the Amazon CloudFront console.
2. Choose the Behaviours view.
3. Choose Create Behaviour or choose an existing and then choose Edit.
4. For Cache Based on Selected Request Headers, choose Whitelist. For Allowed HTTP Methods, choose GET, HEAD, OPTIONS and skip the next step.
5. Under Whitelist Headers, choose headers from the menu on the left, and then choose Add.
6. Choose Yes, Edit.
You need to Whitelist the headers Access-Control-Request-Headers, Access-Control-Request-Method and Origin for our S3.
Reference:https://aws.amazon.com/premiumsupport/knowledge-center/no-access-control-allow-origin-error/
You will also need to enable CORS in your website. For that, open the configuration file/etc/httpd/conf/httpd.conf and search for AllowOverride none. Change it to AllowOverride All. Now add the below lines to the file.htaccess in your document root.
Header set Access-Control-Allow-Origin "*"

Header set Access-Control-Allow-Methods "POST, GET, OPTIONS, DELETE, PUT"
Header set Access-Control-Max-Age "1000"

Header set Access-Control-Allow-Headers "x-requested-with, Content-Type, origin, authorization, accept, client-security-token"
![]()
Category : Linux, WordPress

Albert likes to explore and learn new things. He is hardworking, enthusiastic and is getting expertise in Linux administration, Networking and Security areas. He understands client requirements and is able to act accordingly. He has been working for 2 years with us.


Add new commentSIGN IN