Published on: August 6, 2015 by Vishnu K Raj

Scenario:
In this article, I will summarize the steps and configuration needed to run Nginx reverse proxy for Apache. As you all know Apache rules the web server industry due to its robust and stable nature, but the main drawback of Apache is that it consumes a lot of system resources. Hence we need to optimize our webserver for performance, speed and stability.
Nginx is well-known for its performance and speed, especially when it comes to static contents. Nginx can also be set up to handle dynamic contents using PHP-FPM or similar packages. But the issue is that most of the CMS’s and application need Apache or is not compatible with other webservers. Most application use .htaccess to override default settings or stuffs such as rewrite rules , custom plugin rules and others, hence Apache is an inevitable package when it comes to handling website applications.
However, we can combine the stability and compatibility of Apache along with the performance and speed of Nginx. So that Nginx will be the front end webserver serving the static contents and Apache serves the dynamic contents which of course pulls data from databases and php files. Let us see the steps to use Nginx reverse proxy for the Apache.
1. Install Apache.
yum install httpd httpd-devel -y
2. Configure the Reverse Proxy settings on Apache.
Edit the ‘Listen’ directive in httpd.conf
vi /etc/httpd/conf/httpd.conf
Goto the line that says ‘Listen 80‘ and change it to ‘Listen 81‘ Now we have to add a VirtualHost entry for our domain. Since I am not a big fan of adding Virtualhost entries at the end of the default httpd.conf I will create a separate directory for all the Virtualhost entries and include that folder in httpd.conf. You can go ahead and add the entries in the default httpd.conf itself it is a matter of one or two websites.
mkdir /etc/httpd/conf/vhosts.d
vi /etc/httpd/conf/vhosts.d/virtualhosts.conf
Now we have to add the virtualhost entry.
NameVirtualHost 127.0.0.1:81
# Define Server document root
 DocumentRoot /var/www/html/
# Define the virtual host
<VirtualHost 127.0.0.1:81>
 ServerName www.yourwebsite.com
 ServerAlias yourwebsite.com
 DocumentRoot /var/www/yourwebsite.com
 <Directory "/var/www/yourwebsite.com">
 Options FollowSymLinks -Includes
 AllowOverride All
 Order allow,deny
 Allow from all
 </Directory>
 RewriteEngine on
</VirtualHost>
Make sure that you change the name of the domain from ‘yourwebsite.com’ to the name of your actual website, use the assigned IP to the domain and replace ‘127.0.0.1’ above. Also make sure that you enter the actual Document Root as well.
Now use the Include feature to include the created directory in the httpd.conf. Open the ‘httpd.conf’ and enter the below string.
Include "/etc/httpd/conf/vhosts.d/virtualhosts.conf"
Restart httpd to apply the changes
service httpd restart
3. Install Nginx.
cd /usr/local/src
wget http://nginx.org/packages/centos/6/noarch/RPMS/nginx-release-centos-6-0.el6.ngx.noarch.rpm
rpm -i nginx-release-centos-6-0.el6.ngx.noarch.rpm
yum install nginx -y
4. Configure Nginx main configuration.
vi /etc/nginx/nginx.conf
Now place the below in the nginx.conf, make sure that you keep a copy of the original conf file before doing this.
5. Configure Nginx Reverse Proxy settings.
For configuring Nginx reverse proxy settings, create this file.
vi /etc/nginx/conf.d/yourwebsite.com.conf
Then paste this inside.
server {
 listen 80;
 server_name yourwebsite.com yourwebsite.com;
 access_log off;
 error_log logs/yourwebsite.com-error_log crit;
location ~* .(gif|jpg|jpeg|png|ico|wmv|3gp|avi|mpg|mpeg|mp4|flv|mp3|mid|js|css|html|htm|wml)$ {
 root /var/www/yourwebsite.com;
 expires 365d;
 }
location / {
 client_max_body_size 10m;
 client_body_buffer_size 128k;
 proxy_send_timeout 90;
 proxy_read_timeout 90;
 proxy_buffer_size 128k;
 proxy_buffers 4 256k;
 proxy_busy_buffers_size 256k;
 proxy_temp_file_write_size 256k;
 proxy_connect_timeout 30s;
 proxy_redirect http://www.yourwebsite.com:81 http://www.yourwebsite.com;
 proxy_redirect http://yourwebsite.com:81 http://yourwebsite.com;
 proxy_pass http://127.0.0.1:81/;
 proxy_set_header Host $host;
 proxy_set_header X-Real-IP $remote_addr;
 proxy_set_header X-Forwarded-For $proxy_add_x_forwarded_for;
 }
 location ~ /\.ht {
 deny all;
 }
}
Make sure that you change the name of the domain from ‘yourwebsite.com’ to the name of your actual website, use the assigned IP to the domain and replace ‘127.0.0.1’ above. Also make sure that you enter the actual Document Root as well.
Lets check the above configuration for what actually we have done.
a. We defined the location of static files, and let Nginx cache those files for 1 year using the below directive.
location ~* .(gif|jpg|jpeg|png|ico|wmv|3gp|avi|mpg|mpeg|mp4|flv|mp3|mid|js|css|html|htm|wml)$ {
 root /var/www/yourwebsite.com;
 expires 365d;
 }
b. Then we added the reverse proxy configuration so Nginx can serve the information from xxx.xx.xx.xx:81, which is the port and IP where Apache is listening to.
c. Finally the “location ~ /\.ht {” location block denies access to .htaccess files, if Apache’s document root
concurs with nginx’s one.
6. Now we have to install the reverse proxy add forward module for Apache (mod_rpaf).
mod_rpaf will help Apache to know who connects to it (otherwise the only IP address you will see in your logs
is 127.0.0.1. It changes the remote address of the client visible to other Apache modules when two conditions
are satisfied. First condition is that the remote client is actually a proxy that is defined in httpd.conf. Secondly if
there is an incoming X-Forwarded-For header and the proxy is in it’s list of known proxies it takes the last IP
from the incoming X-Forwarded-For header and changes the remote address of the client in the request
structure. It also takes the incoming X-Host header and updates the virtualhost settings accordingly. For
Apache2 mod_proxy it takes the X-Forwared-Host header and updates the virtualhosts.
cd /usr/local/src
wget https://github.com/y-ken/mod_rpaf/archive/master.zip
unzip master.zip
cd mod_rpaf-master/
apxs -i -c -n mod_rpaf-2.0.so mod_rpaf-2.0.c
Once the installation is complete we need to add a new configuration file for mod_rpaf.
vi /etc/httpd/conf.d/rpaf.conf
Now paste the below snippet inside the rpaf connf file.
LoadModule rpaf_module modules/mod_rpaf-2.0.so
RPAFenable On
RPAFsethostname On
RPAFproxy_ips 127.0.0.1 YOUR.SERVER.IP
Replace ‘YOUR.SERVER.IP’ with your actual server IP.
Now restart httpd to apply the changes.
service httpd restart
Its all Done!! Yay.
Now we can test whether the setting is actually working. Use the below command in a machine with curl utility installed.
curl -Is http://yourwebsite.com
You should be seeing something like below.
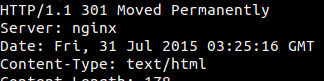
You should see that Nginx is listed in the Webserver directive. Now for testing Apache which serves the dynamic PHP contents create an info.php file inside
your website. You should be seeing something like below.
vi /var/www/yourwebsite.com/info.php
Now visit www.yourwebsite.com/info.php and you should show see the php server information on your screen, then search for the server that is serving the phpinfo file, if you see Apache then your Nginx reverse proxy configuration is working fine.
Thanks you for reading !!
![]()
Category : Apache, Howtos, Linux

Vishnu with his impressive knowledge in core concepts of various operating systems and applications, loves to feel and enjoy the excitement in performing highly sophisticated server operations. His excellent customer support skills and ability to groom new talents makes him one of the most successful mentor in the team. He is passionate about photography and travels a lot to satisfy the thirst of his Canon 600D.


Add new commentSIGN IN