Published on: September 11, 2015 by Vishnu K Raj
Scenario:
A Virtual Server had the ‘/’ partition almost 90 percent of its capacity and hence I had to use the extra added 200GB unpartitioned free space to the LVM volume mounted at ‘/’ without losing the data which already existed in ‘/’.Eventhough the tutorial follows LVM extend of a VPS it can be followed while doing so in a Dedicated Server as well.
IN DETAIL
Below screenshot shows the present scenario of the server whose ‘/’ is almost 90% used. It had 3 partitions in the sda drive.
1. sda1 as /boot
2. sda2 and sda3 as / (lvm group)

As mentioned before since this is a VPS the extra space (200GB) was added by the host and no extra physical drives were added so everything will remain as sda in the tutorial.
Disk Partitioning
First thing first, we will have to partition this free space so that we can add this to the Volume group. We can use the fdisk utility here to do so.
fdisk /dev/sda
Now type ‘m’ to show the Menu.
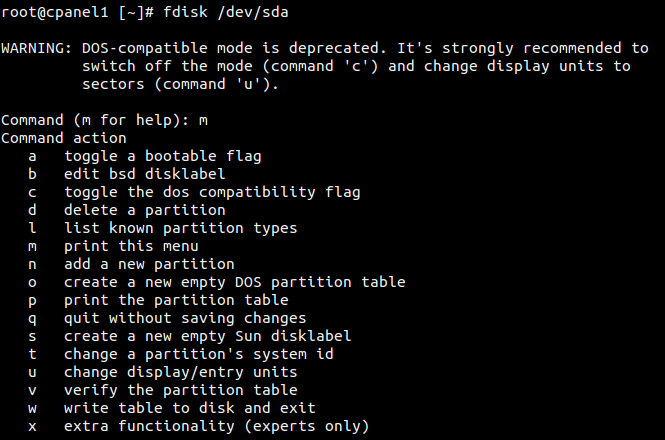
Since this is pretty basic I will briefly go through this.
1. Type ‘n‘ to create a new partition and hit Enter.
2. Now you will be prompted for the partition type. Type ‘p‘ for Primary and hit Enter.
3. Now you will have to enter the partition number. As I mentioned above sda1, sda2 and sda3 is already in use so we type in ‘4‘ so we can create sda4 as the new partition. (Please note this depends on your servers setup).
4. Now we will be prompted for allocating the cylinder values for the partition size. Since I had to use the entire free space I hit Enter two times to select the least available cylinder and the last available cylinder.
5. Now type ‘t‘ and hit Enter to select the partition type.
6. Type in ‘8e’ whih correspinds to Linux LVM and hit Enter.
7. Now type ‘p‘ and hit Enter to check everything before writing the change to the drive.
8. Type ‘w‘ and hit Enter to write the changes to the disk.
Physical Volume (PV) Creation
Now we have to create a physical volume in sda4 as below.
pvcreate /dev/sda4
Volume Group Identification
Now we have to add this PV to the Volume Group. Using the ‘vgdisplay’ we can see the current Volume Group(s).
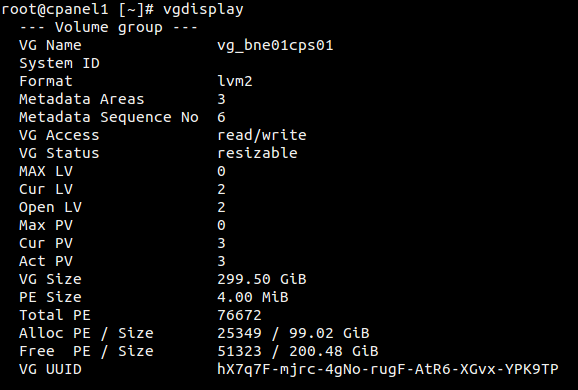 From the above we can make out some information we need in our remaining steps.
1. VG Name : vg_bne01cps01
2. Allocated PE / Size : 25349 / 99.02 GB
3. Free PE / Size : 51323 / 200.48 GB
Extending the Volume Group
Now we have to extend the Volume Group to add /dev/sda4 using the ‘vgextend’ command as below.
vgextend vg_bne01cps01 /dev/sda4
The syntax is
vgextend [space] VG Name [space] PV Name
A result will be shown as below.
![]()
Now we can the see that Volume Group has been extended.
Extending the Logical Volume
The next step is to make the changes in effect by extending the Logical Volume using the ‘lvextend’ command as below.
lvextend -l +51323 /dev/vg_bne01cps01/lv_root
The syntax is
lvextend [space] -l [space] +Free PE / Size VG
As we have only one VG and logical volume ( refer. image 1) the process was quite straight forward.
The result is as below. (Please note the values in the screenshot differ)
![]()
Resizing the partition
Now the final step is to resize the ‘/’ partition to use the extra space without losing any data. This can be done using the ‘resize2fs‘ command as below.
resize2fs /dev/vg_bne01cps01/lv_root
The result is as below.

Now if you want to see the actual process of extending the ‘/’ partition just log into another shell and use the ‘df -h’ command multiple times to see the increasing disk space in ‘/’ as below.

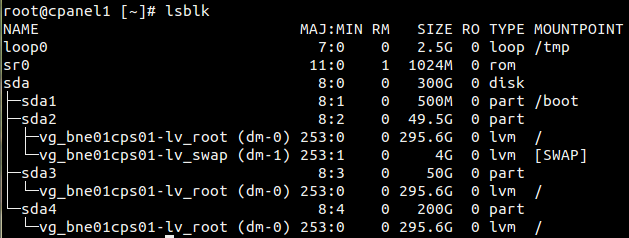
The resizing is complete without any data loss. Now lets check the present allocation of the drives using ‘lsblk’ command.
lsblk
The result is as below.
Thats it. Thank you for going through 🙂
![]()
Category : Linux

Vishnu with his impressive knowledge in core concepts of various operating systems and applications, loves to feel and enjoy the excitement in performing highly sophisticated server operations. His excellent customer support skills and ability to groom new talents makes him one of the most successful mentor in the team. He is passionate about photography and travels a lot to satisfy the thirst of his Canon 600D.


Add new commentSIGN IN