Published on: July 15, 2015 by Vishnu K Raj
Scenario:
Software RAID is when the interaction of multiple drives is organized completely by software. RAID Level 1 (mirroring) achieves increased security since even if one drive fails, all the data is still stored on the second drive. There were a couple of instances where I have to break this RAID configuration. The RAID replace disk have to be done when the following instance occurs,
1. When one of the disk failed and the failed disk had to be replaced.
2. When the client needed to remove one drive which was part of the RAID and add it as a backup drive mounted at /backup.
Both the processes are similar with minor changes in the process flow. In the first scenario were the drive is dead, down time is inevitable since the DataCenter has to replace the failed drive. In the second case we can perform this without any downtimes while the server is live.
So let us start with the second scenario where a healthy drive is requested to be pulled out from a RAID array and get configured as a backup drive. I believe explaining the steps involved with the faulty HDD replacement of first scenario can be sorted out from the process flow for the HDD reconfiguration of the second scenario.
A detailed look into the RAID replace disk process is given below
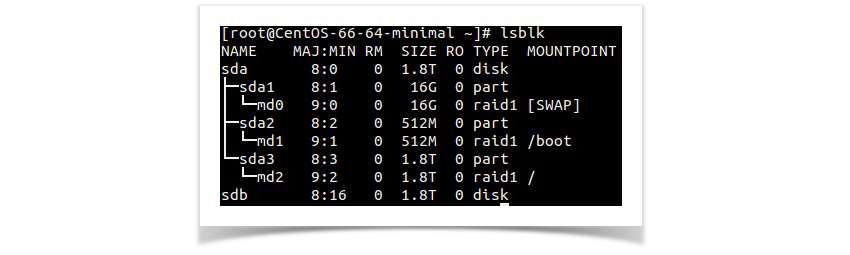
A clear picture about the RAID devices and constituent drives along with the partitions is essential to proceed with the operations.
Let us use the lsblk command to have a somewhat graphical view of the setup in the server.
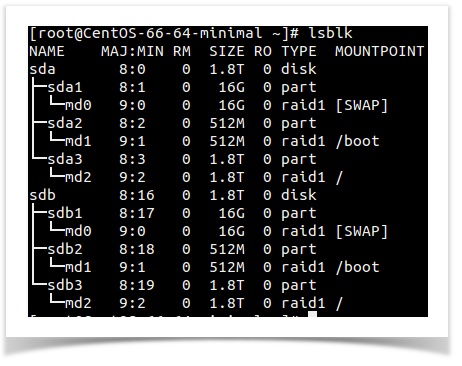
As evident from the output, the software raid devices are mounted as given below
| /dev/md0 | swap |
| /dev/md1 | /boot |
| /dev/md2 | / |
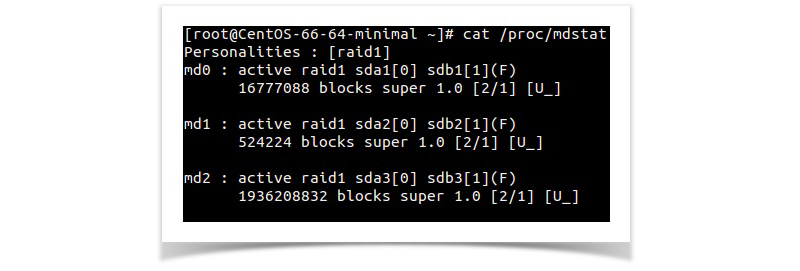
Now, we have a clear picture about the partition schema and configuration of the server. The next crucial step is to evaluate and decide how stable these devices are. A clear picture about the current state of software raid can be obtained from the file /proc/mdstat
The output obtained for the server in this case was as given below
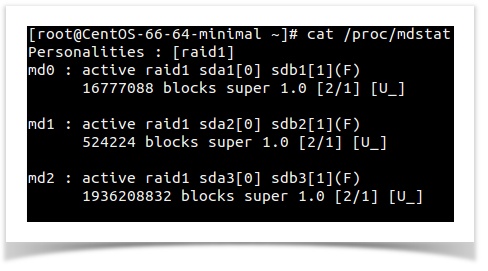
A missing or defective drive is shown by [U_] and/or [_U]. If the RAID array is intact, it shows [UU].
Here as you can see, all the three raid devices shows its state as “[U_]”. The absence of second letter indicates an issue with drives. This is perfectly in synchronization with the expected output of scenario one where a HDD of software raid got failed and we need to replace it with a healthy one.
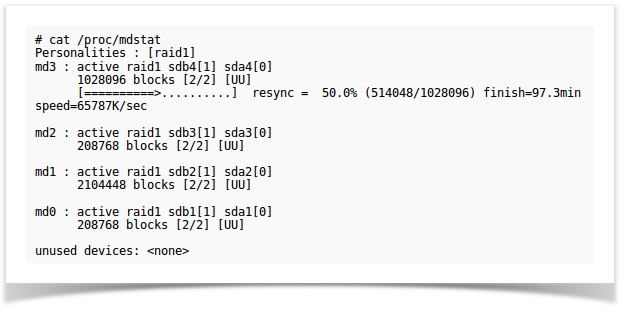
As mentioned in the top portion of the blog. The second scenario demands removal of a healthy drive from a RAID array and its conversion for backup storage. Since there is no drive failure, the RAID state would be in an intact or healthy status. The expected output for a healthy raid status is represented below with a file picture.
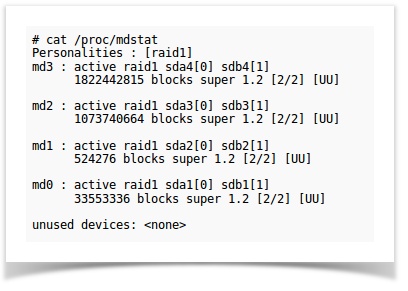
I hope you should be able to distinguish between a degraded RAID and a healthy one by comparing the output of /proc/mdstat given in the two instances.
Since the drives are not broken in the second case, to remove the drive from the RAID array we will have to manually declare the drive as failed in the RAID status.
The following command shows the drives that are part of an array.
mdadm --detail /dev/md0
Now the second drive or sdb should be declared as failed to start the process. The following commands are used in declaring the drives as failed. Each partition should be done separately.
mdadm --manage /dev/md1 --fail /dev/sdb1

mdadm --manage /dev/md1 --fail /dev/sdb2

mdadm --manage /dev/md1 --fail /dev/sdb3
Now the RAID status will be as shown below .
Something we can relate to the scenario in the first case. In some cases only one or two partition will be shown as failed, in these case the other partition should also be declared as failed using the above command for that particular drive.
Now you can remove the second drive (sdb) from the RAID array using the below commands.
mdadm /dev/md0 -r /dev/sdb1

mdadm /dev/md1 -r /dev/sdb2

mdadm /dev/md2 -r /dev/sdb3
Once the drive is removed from the RAID array, we need to proceed with the actual process of physical disk replacement based on the scenarios mentioned earlier.
In the first case were the drive is broken we will have to contact the DC to replace the drive. In the second scenario we can partition the detached drive and add it as a backup drive mounted at /backup.
Let us consider the first scenario.
1. Since the failed drive (sdb) is removed from the software RAID, we can ask the Data Center to replace the failed drive. Serial number of the failed drive will help the DC guys to identify the drive to be replaced in a faster way. To get the serial number of the drive, we use the command hdparm.
The following command will provide the needed serial number of a drive.
hdparm -I /dev/sda | grep Serial (In case of the drive sda)
The output will be as below.

Once the drive is replaced by the Data Center it needs to be integrated into the RAID array. This needs to be done for each partition.
mdadm /dev/md0 -a /dev/sdb1

mdadm /dev/md1 -a /dev/sdb2

mdadm /dev/md2 -a /dev/sdb3
The new drive is now part of the array and will be synchronized. Depending on the size of the partitions this procedure can take some time. The status of the synchronization can be observed as below from the representational image.
As we had seen in Step 4, the drive is the removed from the RAID. Below is how it will look like when the second drive is removed from the RAID array using the lsblk command.
You can see that the sdb drive is now not part of the RAID array.
To configure the drive /dev/sdb for data backup, we need to partition and then mount it. You can simply partition this drive using fdisk.
I hope you all are familiar with partitioning a drive using fdisk and hence not intending for an article here.
Once the drive is partitioned and formatted, we need to mount it for the backup storage. Now create a directory as /backup and use the mount command to mount the sdb1 partition as /backup.
mkdir /backup mount /dev/sdb1 /backup
Now as you are already aware add this mount point in the /etc/fstab to make the changes permanent.
Thank you for going through. 🙂
![]()
Category : Howtos, Linux

Vishnu with his impressive knowledge in core concepts of various operating systems and applications, loves to feel and enjoy the excitement in performing highly sophisticated server operations. His excellent customer support skills and ability to groom new talents makes him one of the most successful mentor in the team. He is passionate about photography and travels a lot to satisfy the thirst of his Canon 600D.


Add new commentSIGN IN