Published on: July 1, 2019 by Eric Maze
Scenario:
cPanel is a Linux based web hosting control panel that works through a Graphical user interface(GUI). The main advantage of cPanel server is that it can be easy to install and configure websites and E-mail. It can be even installed on an operating system which is minimally configured.
WHM – Web Host Manager is a tool used by both server administrators as well as resellers. Resellers can access WHM with reseller permissions and privileges reseller account enables them to create and manage sub-accounts and do limited modifications.
Steps to build a cPanel hosting environment on Amazon AWS Using Cpanel/WHM enabled AMIs
Let us look into the steps to use the Amazon Web Services (AWS) cloud service and the cPanel & WHM Amazon Machine Image (AMI) to build a production hosting environment. AWS, more specifically EC2, VPC, and S3, has the advantages of rapid deployment, unlimited scaling, load balancing, and global distribution abilities.
Pre-requisite
-You must obtain an elastic IP when you create your server.
-You must purchase a license for cPanel & WHM. New installations automatically receive a free 15-day trial license.
-You cannot change your hostname within cPanel & WHM after you launch an instance. -Make certain that you configure it before you launch.
-An incorrect hostname may cause license errors.
-To configure your instance to retain the changed hostname, perform the steps in the Fix hostname issues section below.
Step 1: Launch an Amazon AWS instance
Create and add key pairs.
If your AWS account does not include at least one key pair, you must create one and add it to your local system before you can launch your instance. To do this, perform the following steps:
-Sign in to your AWS account.
-From the Services menu in the top-left corner, select EC2 under Compute. The EC2- Management Console will appear.
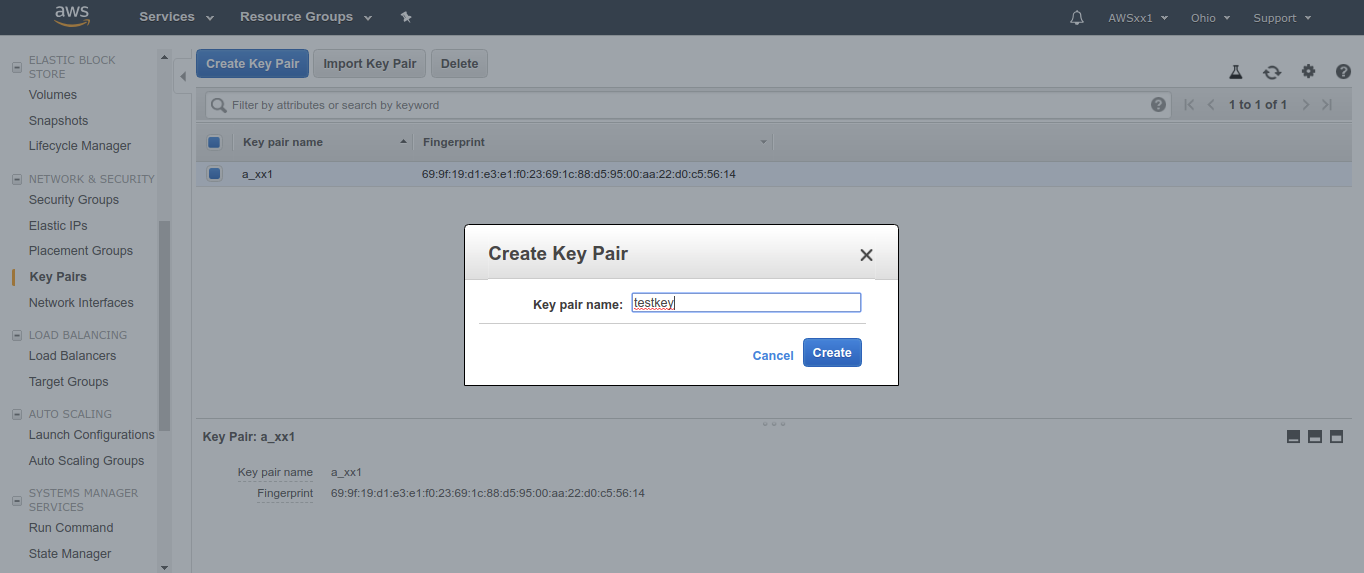
-In the left-side menu under Network & Security, click Key Pairs. The list of available key pairs will appear.
-Click Create Key Pair. The Create Key Pair window will appear.
-Enter a name for the key pair in the Key pair name text box.
-Click Create. The list of key pairs will refresh to display the new key pair, and your browser will automatically download the new key pair’s .pem file.
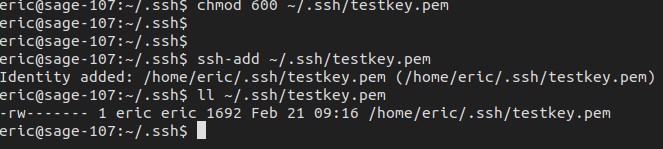
-On the command line on your local computer, move the new key pair’s .pem file to the ~/.ssh directory. For example, on an MacOS™ computer that uses the default download folder, run the following command, where example represents the key pair’s name:
#mv ~/Downloads/example.pem ~/.ssh
-Run the following command to modify the permissions for the .pem file, where example represents the key pair’s name:
#chmod 600 ~/.ssh/example.pem
-Run the following command to add the key pair, where example represents the key pair’s name:
#ssh-add ~/.ssh/example.pem
An Identity added message will appear.
After you create and add the new key pair, it will automatically appear in the list during the instance launch process.
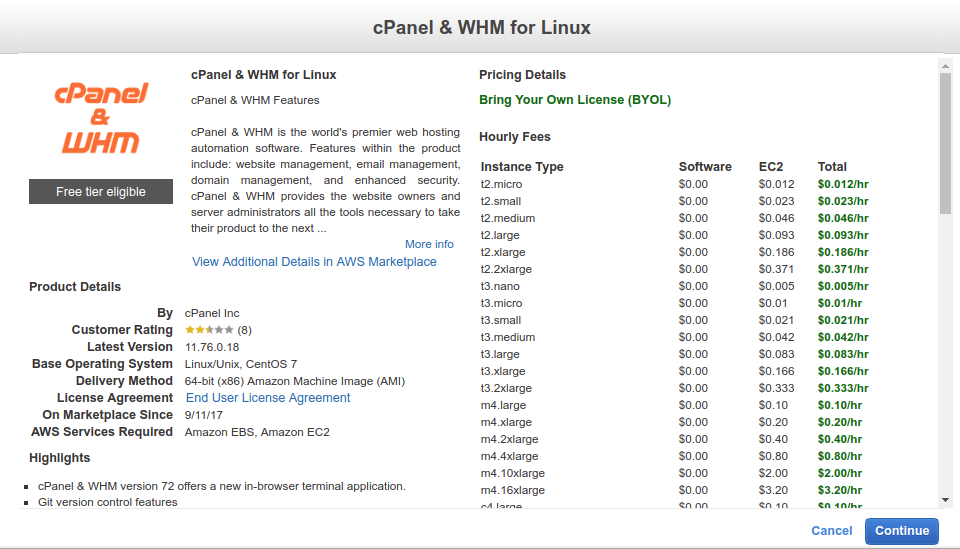
-Navigate to the cPanel & WHM AMI.
-Navigate to the cPanel & WHM AMI in the AWS Marketplace and click Continue to Subscribe.
-Continue to Configuration.
In the top-right corner, click Continue to Configuration.
-Verify fulfillment option.
Confirm that the system uses the 64-bit (x86) Amazon Machine Image (AMI) in the Fulfillment Option menu.
-Verify version settings.
By default, the system uses the AMI’s default version to configure the instance version. Under Version, verify whether the system selected the desired AMI version. To select a different version, click Version and select a version.
-Verify region settings.
Under Region, ensure that AWS automatically selected the correct region. To select a different region, click Region and select a region.
-Continue to Launch.
In the top-right corner, click Continue to Launch.
-Launch through Website.
In the Choose Action menu, select Launch from Website.
-Select an instance type.
Under EC2 Instance Type, select the instance type that you wish to use. The list of instance types includes all of the types that the cPanel & WHM AMI supports.
Step 2: Configure VPC settings.
Under VPC Settings, verify the Virtual Private Cloud (VPC) that the system selected. To change one of these settings, click VPC Settings and select the desired VPC
-Configure Subnet Settings.
Under Subnet Settings, verify the subnet that the system selected. If you wish to change the subnet, select the appropriate subnet from the menu.
-Configure security settings.
Under Security Group, verify the new instance’s port and security settings.
-Select a key pair.
Under Key Pair, verify whether the system selected the desired key pair. To select a different key pair, click Key Pair and select the desired key pair from the menu.
Step 3: Launch the instance.
At the bottom-right corner of the page, click Launch. A confirmation page that lists all of your instance’s information will appear.
-Click Launch to launch the instance. A success message will appear
-Click Previous to return to the cPanel & WHM AMI listing in the AWS Marketplace.
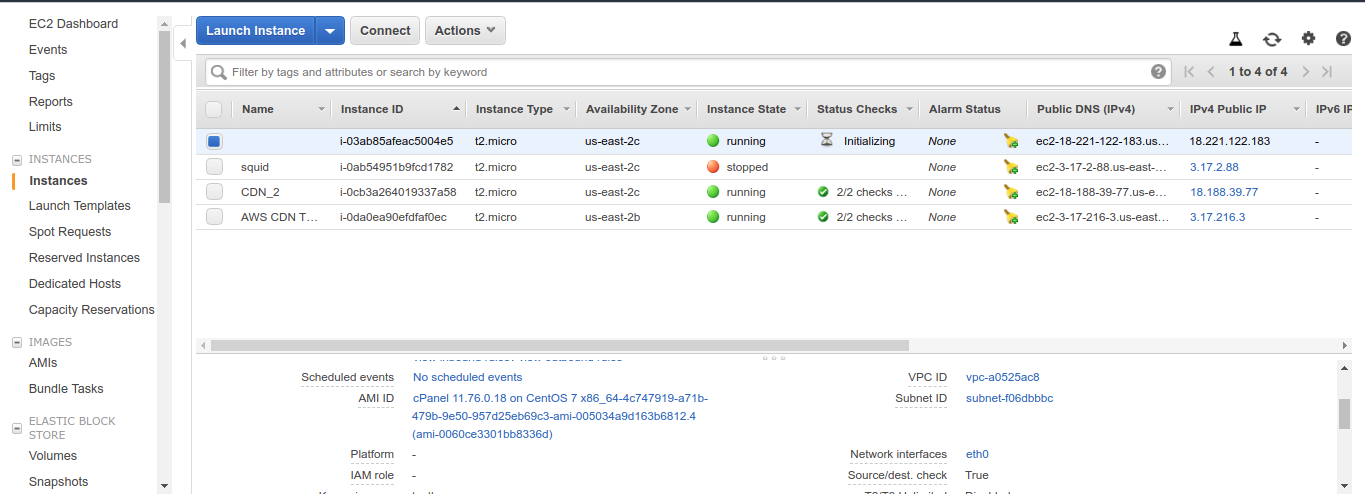
-Click EC2 Console to navigate to the EC2 Management Console which will display your new instance. The EC2 Management Console allows you to launch EC2 instances, manage or check instance status, view DNS information, and other instance management tasks.
Fix hostname issues.
If you change your hostname after you launch your instance, AWS will reset it to the original hostname each time that the instance reboots. To resolve this issue, run the following command:
printf 'preserve_hostname: true\nmanage_etc_hosts: false\n' > /etc/cloud/cloud.cfg.d/99-preserve-hostname.cfg
Steps to build a cPanel hosting environment on Amazon AWS Using Standard AMIs
Step 1: Install a fresh server of your Desired OS(CentOS/RedHat linux/Amazon Linux)
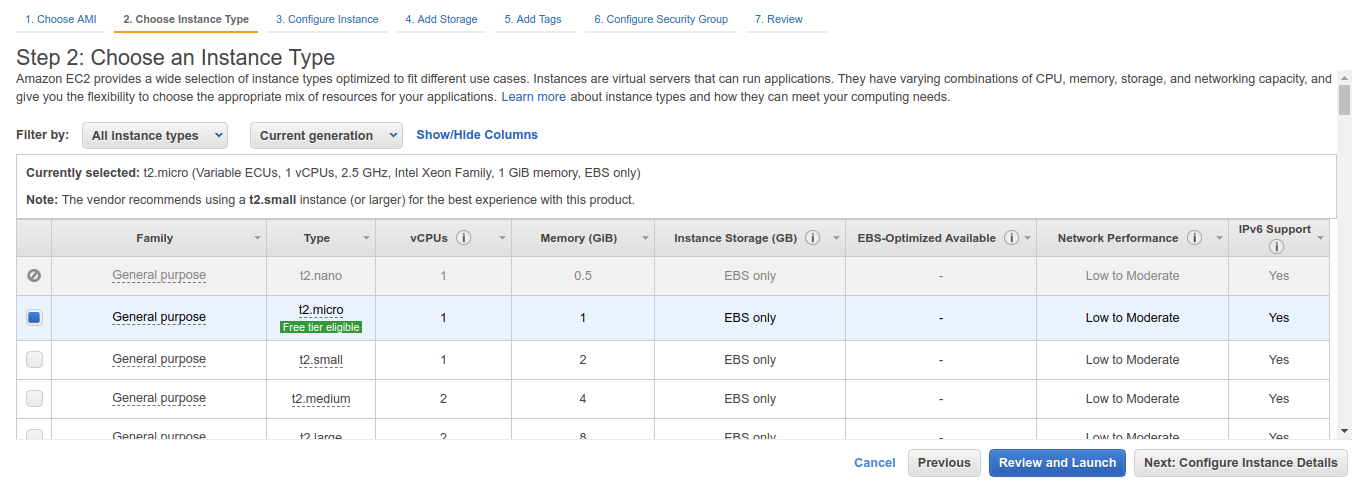
Step 2: Choose the instance type either t2.small or t2.medium or t2.large cPanel requires at least 2GB of RAM to function so, it’s better to choose t2.small or higher.
Step 3: Change the default storage of 8GB to desired size, cPanel requires at least 40GB of space. We are set it accordingly so as to accommodate website files as well as backup.
Step 4: Allow the following inbound ports in AWS security group settings (FTP)20-21,(SSH) 22,(HTTP) 80,(HTTPS) 443,(cPanel) 2082-2083,(WHM)2086-2087,(webmail) 2095-2096
Step 5: Now choose either existing key pair or create new key pair. It is required to login to the instance.
Step 6: Now we can launch our Desired instance and once the instance is launched successfully attach the Elastic IP to the newly created instance. Elastic IP is required to have static IP to the instance.
Step 7: Now we can log in into server using public ip and install cPanel control panel. To install cPanel in AWS EC2 instance you have to download and run the installation script provided by cPanel.
Before installing cPanel you must have Perl installed on your server as cPanel is written in Perl. To install Perl on your system, login as root user and run the following command.
#yum -y install perl
Now we will need to set the hostname for your server. A hostname is a FQDN or Fully Qualified Domain Name which will be used to identify our server. To change your hostname run the following command
#hostname aws.mydomain.com
You can replace aws.mydomain.com with your hostname. You must own the domain of which your are setting up the hostname.
Next, you will need to change your current directory to /home directory, run the following command to do this.
#cd /home
Download the installation script from cPanel website by executing the following command –
#curl -o latest -L https://securedownloads.cpanel.net/latest
Now run the installation script by executing the following command –
#sh latest
This will start our cPanel installation, we can now sit back and relax as the installation takes around half hour to complete. Once the installation script is finished you will see the following output at the end for a successful installation:
“Thank you for installing cPanel & WHM !
You can now open your browser and go to https://your-server-ip:2087 to access WHM. Login with username root and your root account’s password. Make sure that you use https to access WHM in browser. For example if your IP is 192.168.0.85 then you will have to go to https://192.168.0.85:2087 . We can also use FQDN instead of the IP as long as the domain name is set to point to this IP.
Once you are logged in you will be taken to initial server setup.
In Step 1 you will be shown the cPanel & WebHost Manager End User License Agreement, you can go through the agreement and click on I Agree/Go to Step 2 once you are ready.
In Step 2 you will be taken to the Setup Networking section. Provide your contact information, a valid email address which should not be hosted on the same server. This email will be used for sending critical information about server.
Scroll down to find hostname section, you can enter a new hostname for your server by replacing the old one which we have given during installation. If you don’t want to change the hostname, you can leave the hostname field as it is. Enter DNS resolvers for your server. Resolvers will be used to fetch DNS entries of any website. If your service provider has DNS resolvers then cPanel will automatically detect and fill them for you, if not then you can use Google’s public DNS resolvers which are 8.8.8.8 and 8.8.4.4 or OpenDNS’s public DNS resolvers which are 208.67.222.222 and 208.67.220.220.
Next you can select your Main Network Device, an IP available on that device will be considered as the main IP address of your server.
Once done click on Save & Go to Step 3 button.
In Step 3 you will see the section to Set Up IP Addresses. If you have more than one IP address assigned to your server and your interface, you can add them here. To add a new IP address just enter the IP address in IP Address(es) to Add field, if you have a pool of IP address you can also add multiple IP address using CIDR notations. Enter the Subnet Mask and choose the network interface. Click on Add IP(s) button to add the IP address. Down below you will see the list of current IP address available to your server.
If you wish to use the default settings just click on Skip This Step and Use Default Settings button on the top. If you have added IP address then click on Go to Step 4 button.
In Step 4 you will be taken to Nameserver configuration, you will have three options to choose from, you can compare the advantage and disadvantages of using different Name server applications. Recommended is that you choose BIND as it has most advantages. If you do not want to run a DNS server on your local machine you can disable the nameserver by choosing the disable option.
Next, choose the nameserver which your server will use. You may want it to be ns1.yourdomain.com or ns2.yourdomain.com. You will need to create hostnames in your domain control panel. Now add A Entries for your hostname by selecting the Add “A Entries” for Hostname checkbox.
Enter the IP address of your server if it is not prefilled. Finally click on Save & Go to Step 5 button to go to step 5.
In Step 5 You will see the configuration page for your services. In FTP configuration you can choose from two FTP applications, recommended is Pure-FTPD. Choose the disabled option if you want to disable the local FTP server. In mail configuration you can either choose Dovecot which is also recommended or you can choose to disable mail server by choosing disabled option.
Next you can configure cPHulk Brute Force Protection, select Enable cPHulk check box to enable cPHulk. Next you can select settings for cPHulk from many options. In Advanced setting of cPHulk you can choose duration to block a user from logging in if it encounters certain failures by Account and IP address.
You can also provide maximum failures before an IP address is blocked for a day. Finally click on Save & Go to Step 6 button.
In Step 6 you will be asked if you want to use file system quotas. It is recommended that you select Use file system quotas options. If you choose not to use file system quotas then you will not be able to track the disk space used by any user or website.
Click Finish Setup Wizard to complete the initial setup wizard. You will now see some new features of cPanel in its feature showcase.
In recommended features you will see cPanelID, which enables a user to login to cPanel with his cPanelID. This feature enables a user to login to multiple cPanels with single user id. You can enable this feature by choosing the enable option. To disable this, select No, thank you option.
Next, you will see cPHulk’s username based protection feature which only blocks a certain user instead of blocking the IP address so that other user may login from same IP. There are more new features like PHP-FPM, ModSecurity, cPanel Reset Password and more. You can either choose to enable them or disable them by selecting No, thank you option.
Once you have chosen to enable or disable a feature. Click on Save Settings button to save the settings and go to WHM. You will now see the default home page of WHM.
To see the user level interface of cPanel/WHM, you will need to create a user account first. Go to Home > Account Functions > Create a New Account in WHM. In the “Create a New Account Interface”, enter the main domain of user, username will automatically get filled according to the domain, you can also use a different username if you want to. Enter a password for your user, you may also use password generator to generate a strong password. Enter a valid email for your user. You can choose a package from the dropdown, but as we have installed cPanel recently there will not be any package. If you do not select any package, cPanel will provide unlimited resources to this account.
Next, in the settings options, select the default theme. You can choose paper_lantern which is a modern and responsive. If you want the old non responsive theme you can select x3 or x3mail, choose the language in the locale setting. In the reseller setting you can make the account a reseller account. A reseller has ability to create more accounts under it. In DNS settings select the options to enable DKIM and SPF on the account. In the mail routing settings, unless required, leave the options as Local Mail Exchanger. Click on the create button to create the user account. cPanel will now run the script to create the user account and the output will be shown to you.
Now you can go to https://your-server-ip:2083 to access cPanel, you will see the login prompt like shown below. Enter the username and password you have created recently and click on Login button.
Once you are logged in you will see the cPanel Home interface from where a user can manage all the settings related to their website.

Category : cPanel, Linux


Add new commentSIGN IN