In the previous post, we have configured the basic set ups required for implementation of OpenStack. In this post I am focusing on installation and configuration of Identity or Keystone service for OpenStack on Ubuntu LTS.
OpenStack Packages
This step describes how to edit the repository to get the latest stable OpenStack packages. Here we use Ubuntu Cloud Archive repository to get the required packages. Ubuntu Cloud Archive is a special repository that allows us to install newer releases of OpenStack on any stable supported version of Ubuntu.
The OpenStack version/package used in this blog is OpenStack Icehouse. To add the repository run the following on the controller node.
root@controller# apt-get install python-software-properties

root@controller# add-apt-repository cloud-archive:icehouse

root@controller# apt-get update

root@controller# apt-get dist-upgrade
Once the repository is updated, restart the system for the changes to take effect.
Identity or Keystone Configuration
1) Install keystone
Install the Identity Service using the following command
root@controller# apt-get install keystone
The Keystone Service uses MySQL database to store information. So you need to specify the location of the database in the Keystone configuration file.
Add/modify the entry shown below in /etc/keystone/keystone.conf file under the [database] section.
[database]

connection = mysql://keystone:KEYSTONE_DBPASS@controller/keystone
Remember to change the KEYSTONE_DBPASS with the desired password for the Keystone database user.
By default, the Ubuntu packages create a SQLite database.Delete the keystone.db file created in the /var/lib/keystone/ directory so that it does not get used by mistake instead of MySQL.
root@controller# rm /var/lib/keystone/keystone.db
Login to MySQL database as root in the controller node and create the keystone database user.
root@controller# mysql -u root -p
mysql> CREATE DATABASE keystone;
mysql> GRANT ALL PRIVILEGES ON keystone.* TO 'keystone'@'localhost' \ IDENTIFIED BY 'KEYSTONE_DBPASS';
mysql> GRANT ALL PRIVILEGES ON keystone.* TO 'keystone'@'%' \ IDENTIFIED BY 'KEYSTONE_DBPASS';
mysql> exit
Remember to change the KEYSTONE_DBPASS to match the one set in /etc/keystone/keystone.conf.
Create the database tables for the Keystone database using the following command
root@controller# su -s /bin/sh -c "keystone-manage db_sync" keystone
Create authorization token to be used as a secret shared key between the Identity service and other OpenStack services. I use OpenSSL to generate a random key as shown below.
root@controller# openssl rand -hex 10
Replace ADMIN_TOKEN in the [DEFAULT] section of /etc/keystone/keystone.conf file with the result of the previous/above OpenSSL command.
[DEFAULT]
admin_token = ADMIN_TOKEN
Configure the log directory by updating the [DEFAULT] section of the /etc/keystone/keystone.conf as shown below.
[DEFAULT]
log_dir = /var/log/keystone
Restart the Keystone Service
root@controller# service keystone restart
By default, the Identity Service stores expired tokens in the database indefinitely. This may increase database size and decrease performance. So we set a crontab to delete or purge expired tokens as shown below.
root@controller# (crontab -l -u keystone 2>&1 | grep -q token_flush) || \ echo '@hourly /usr/bin/keystone-manage token_flush >/var/log/keystone/keystone-tokenflush.log 2>&1' >> /var/spool/cron/crontabs/keystone
2) Define Users, Tenants and Roles
After you have installed Identity service, setup users, tenants and roles for authentication to allow access to endpoints and other services.
Normally a username and password is used as the authentication for the Identity service, but till this we have not yet created any users. So we use the previously created authentication token instead of a username and password.
We pass this token to the keystone command by setting the values and variables as shown below
root@controller# export OS_SERVICE_TOKEN=ADMIN_TOKEN
Replace ADMIN_TOKEN with the token we have created in the keystone installation step using openssl command.
root@controller# export OS_SERVICE_ENDPOINT=http://controller:35357/v2.0
3) Create an Admin User
We create and admin user, role and tenant for the administrative interaction with OpenStack Services.
By default, Keystone creates a special “_member_" role. The OpenStack Dashboard grants access to users with this role by default. We will give the admin user access to this role in addition to the admin role.
a) Create the admin user
root@controller# keystone user-create --name=admin --pass=ADMIN_PASS --email=ADMIN_EMAIL
Replace ADMIN_PASS with the desired password for admin user and ADMIN_EMAIL with an associated email account to use.
b) Create admin role
root@controller# keystone role-create --name=admin
c) Create admin tenant
root@controller# keystone tenant-create --name=admin --description="Admin Tenant"
d) Link the admin user, admin role and admin tenant together using the user-role-add option
root@controller# keystone user-role-add --user=admin --tenant=admin --role=admin
e) Link the admin user, member_role and the admin tenant
root@controller# keystone user-role-add --user=admin --role=_member_ --tenant=admin
3) Create a normal User
This normal user account is used for non-administrative interaction with Openstack services.
Create the demo user
root@controller# keystone user-create --name=demo --pass=DEMO_PASS --email=DEMO_EMAIL
Replace DEMO_PASS with the desired password for demo user and DEMO_EMAIL with the associated email account.
Create demo tenant
root@controller# keystone tenant-create --name=demo --description="Demo Tenant"
Link the demo user, member_role and the demo tenant
root#controller# keystone user-role-add --user=demo --role=_member_ --tenant=demo
4) Create a service tenant
OpenStack services also require a username, tenant, and role to access other OpenStack services. In this basic installation, OpenStack services share a single tenant named service.
Create the service tenant
root@controller# keystone tenant-create --name=service --description="Service Tenant"
As we install and configure other services we use this service tenant group to create additional users and roles.
5) Define services and API endpoints
These are defined so that the Keystone service can track which all services are configured and where they are located on the network.
Two commands are used:
keystone service-create. Describes the service.
keystone endpoint-create. Associates API endpoints with the service.
Use the OS_SERVICE_TOKEN environment variable, as set previously, for authentication.
Create a service entry for the Identity service itself
root@controller# keystone service-create --name=keystone --type=identity \ --description="OpenStack Identity"
Define API endpoint for the Identity service
root@controller# keystone endpoint-create \

--service-id=$(keystone service-list | awk '/ identity / {print $2}') \ --publicurl=http://controller:5000/v2.0 \ --internalurl=http://controller:5000/v2.0 \ --adminurl=http://controller:35357/v2.0
6) Verify the Identity service installation
Unset the token variable created earlier
root@controller# unset OS_SERVICE_TOKEN OS_SERVICE_ENDPOINT
Use the regular username based authentication from now
root@controller# keystone --os-username=admin --os-password=ADMIN_PASS \

--os-auth-url=http://controller:35357/v2.0 token-get
In response, you receive a token paired with your user ID. This confirms that the admin user account is established with the expected credentials.
Set up a admin-openrc file with the entries as shown below.
export OS_USERNAME=admin
export OS_PASSWORD=ADMIN_PASS
export OS_TENANT_NAME=admin
export OS_AUTH_URL=http://controller:35357/v2.0
Source the file to read the environment variables
root@controller# source admin-openrc.sh
Make sure the file is sourced correctly by running the below command
root@controller# keystone token-get
This should return a token and ID of the admin tenant.
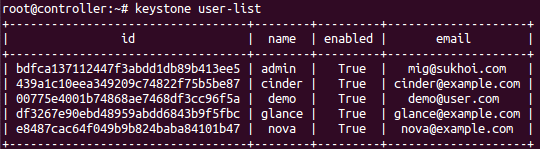
Run the below commands and make sure the output is similar to the ones shown in the screenshots.
root@controller# keystone user-list
You will have a similar output as shown in the screen shot below. The screen shot shows additional users, you should have only two(admin and demo).
root@controller# keystone user-role-list --user admin --tenant admin