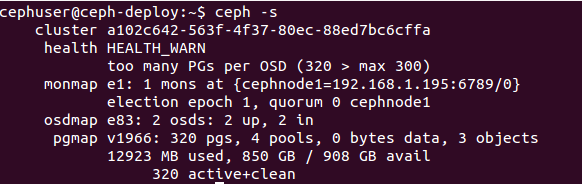
This tutorial aims at Openstack integration with CEPH Block device or implementing Rados Block Device(RBD) as the Storage Backend for Openstack Block Storage Service . To know more about RBD please see my post on CEPH ( The blog links are available in the Recommended Readings section) . To use Ceph Block Devices with OpenStack, you must have access to a running Ceph Storage Cluster first. So make sure you have configured a CEPH storage Cluster and is in active+clean state as shown in the screenshot below.
The parts of Openstack that integrates with CEPH are:
- Images
In Openstack, Glance Service or the Image service manages images for VM instances. The VM uses the bootable images from glance to boot for the first time. Intregrating this image into CEPH means, the VM images that Glance Service creates is stored in the RADOS cluster rather than storing it in the same physical node where the glance service runs.
- Volumes
The Block Storage Service of Opensatck(cinder) uses cinder-volume service to manage Block devices. All the required storage space for a VM instance is provided as block storage. Openstack uses block devices to either provide bootable volumes to VM’s or to attach volumes to running VMs. The storage space is taken from the same node where the cinder-volume service runs. In my Openstack configuration, a separate node is used for serving Block devices. Integrating volumes with CEPH means that, the volumes created with Openstack is actually provided by the nodes participating in the RADOS cluster. The entire Block Device is stripped and stored as objects in CEPH, but virtually we get a block device as such to use with VM’s.
- VM’s
By default when you boot a VM in Openstack, the disk appears as a disk on the node that runs the hypervisor portion of compute service(usually under /var/lib/nova/instances/<uuid>/). In our case its the compute node that holds the files for the operating system of the VM’s. Integrating this with CEPH makes the files for the operating system of a VM to be stored on the RADOS cluster in a separate pool. This allows us to boot every VM inside CEPH directly without using Openstack Cinder Service, which is advantageous because it allows us to perform maintenance operations easily with the live-migration process.
Note : Ceph doesn’t support QCOW2 for hosting a virtual machine disk. Thus if you want to boot virtual machines in CEPH, the Glance image format must be RAW.
Now lets see how the integration is done.
- By default, CEPH creates a pool named rbd numbered 0. We create three more pools named VM, images and volumes to store VM data, glance images and cinder volumes respectively in CEPH cluster.
For this login to the ceph-deploy admin node and run the following commands.
cephuser@ceph-deploy$ ceph osd pool create volumes 128
cephuser@ceph-deploy$ ceph osd pool create images 128
cephuser@ceph-deploy$ ceph osd pool create vms 128
Here 128 is the number of Placement Groups(PG) each Pools has.
- Make sure that the pools are created using the following commands
cephuser@ceph-deploy$ ceph osd lspools
Make sure the three new pools are listed as shown in the screenshot below.
![]()
Configure OpenStack Ceph Clients
The nodes running glance-api, cinder-volume and nova-compute act as Ceph clients. Each of these nodes requires the ceph.conf file. Copy /etc/ceph/ceph.conf file to each of these nodes as shown below.
cephuser@ceph-deploy$ ssh root@controller sudo tee /etc/ceph/ceph.conf </etc/ceph/ceph.conf
cephuser@ceph-deploy$ ssh root@compute sudo tee /etc/ceph/ceph.conf </etc/ceph/ceph.conf
cephuser@ceph-deploy$ ssh root@cinder sudo tee /etc/ceph/ceph.conf </etc/ceph/ceph.conf
Install Ceph client packages
- On the node that runs glance-api service(controller node) install Python bindings for librbd as follows.root@controller# apt-get install python-rbd
- On the nova-compute(compute node) and cinder-volume node(cinder node), install Python bindings and the ceph command line tools:root@compute# apt-get install ceph-common python-rbd
root@cinder# apt-get install ceph-common python-rbd
Setup Ceph Client Authentication
- Create a new user for Cinder and Glance. Execute the following commands on the ceph-deploy admin node.
cephuser@ceph-deploy$ ceph auth get-or-create client.cinder mon 'allow r' osd 'allow class-read object_prefix rbd_children, allow rwx pool=volumes, allow rwx pool=vms, allow rx pool=images'
cephuser@ceph-deploy$ ceph auth get-or-create client.glance mon 'allow r' osd 'allow class-read object_prefix rbd_children, allow rwx pool=images'
- Add the keyrings for client.cinder and client.glance to the respective nodes and change their ownership as shown below.
cephuser@ceph-deploy$ ceph auth get-or-create client.glance | ssh root@controller sudo tee /etc/ceph/ceph.client.glance.keyring
cephuser@ceph-deploy$ ssh root@controller sudo chown glance:glance /etc/ceph/ceph.client.glance.keyring
cephuser@ceph-deploy$ ceph auth get-or-create client.cinder | ssh root@cinder sudo tee /etc/ceph/ceph.client.cinder.keyring
cephuser@ceph-deploy$ ssh root@cinder sudo chown cinder:cinder /etc/ceph/ceph.client.cinder.keyring
- Nodes running nova-compute(Compute node) need the keyring file for the nova-compute process. Add the keyring file as shown below.
cephuser@ceph-deploy$ ceph auth get-or-create client.cinder | ssh root@compute sudo tee /etc/ceph/ceph.client.cinder.keyring
- Add the secret key to libvirt and remove the temporary copy of the key on the compute node as shown below
root@compute# uuidgen
The output will be a key similar to 457eb676-33da-42ec-9a8c-9293d545c337
root@compute# cat > secret.xml <<EOF
<secret ephemeral='no' private='no'>
<uuid>457eb676-33da-42ec-9a8c-9293d545c337</uuid>
<usage type='ceph'>
<name>client.cinder secret</name>
</usage>
</secret>
EOF
root@compute#  virsh secret-define --file secret.xml
Secret 457eb676-33da-42ec-9a8c-9293d545c337 created
root@compute# virsh secret-set-value --secret 457eb676-33da-42ec-9a8c-9293d545c337 --base64 $(cat client.cinder.key) && rm client.cinder.key secret.xml
Note down the uuid of the secret for configuring nova-compute later.
Configure OpenStack to use CEPH
- Configuring Glance
In order to use CEPH block device(RBD) by default, configure Glance as shown below.
Edit/modify the entries as shown below in /etc/glance/glance-api.conf under the [DEFAULT] section on the controller node.
——————————————-
default_store = rbd
rbd_store_user = glance
rbd_store_pool = images
rbd_store_chunk_size = 8
show_image_direct_url = True #enables copy-on-write cloning of images
rbd_store_ceph_conf = /etc/ceph/ceph.conf
——————————————-
To avoid images getting cached under /var/lib/glance/image-cache/, add the following entries under the [paste_deploy] section in /etc/glance/glance-api.conf.
——————————–
flavor = keystone
——————————–
- Configuring Cinder
OpenStack requires a driver to interact with Ceph block device RBD and also the pool name for the block device. On the cinder node, edit /etc/cinder/cinder.conf by adding the following entries under the [DEFAULT] section.
——————————————————–
volume_driver = cinder.volume.drivers.rbd.RBDDriver
rbd_pool = volumes
rbd_ceph_conf = /etc/ceph/ceph.conf
rbd_flatten_volume_from_snapshot = false
rbd_max_clone_depth = 5
rbd_store_chunk_size = 4
rados_connect_timeout = -1
glance_api_version = 2
rbd_user = cinder
rbd_secret_uuid = 457eb676-33da-42ec-9a8c-9293d545c337 (this is the uuid secret key created earlier)
——————————————————-
-
Configuring Nova
On the compute node, edit/modify the ceph configuration file /etc/ceph/ceph.conf with the following entries under the [client] section.
——————————————————————
[client]
rbd cache = true
rbd cache writethrough until flush = true
admin socket = /var/run/ceph/guests/$cluster-$type.$id.$pid.$cctid.asok
log file = /var/log/qemu/qemu-guest-$pid.log
rbd concurrent management ops = 20
——————————————————————
Create the necessary directories for the socket file and the log files:
root@compute# mkdir -p /var/run/ceph/guests/ /var/log/qemu/
Edit/modify the /etc/nova/nova.conf file with the following entries under the [DEFAULT] section.
———————————————————-
libvirt_images_type = rbd
libvirt_images_rbd_pool = vms
libvirt_images_rbd_ceph_conf = /etc/ceph/ceph.conf
libvirt_disk_cachemodes=”network=writeback”
rbd_user = cinder
rbd_secret_uuid = 457eb676-33da-42ec-9a8c-9293d545c337
#disable file injection
libvirt_inject_password = false
libvirt_inject_key = false
libvirt_inject_partition = -2
#ensure proper live migration
libvirt_live_migration_flag=”VIR_MIGRATE_UNDEFINE_SOURCE,VIR_MIGRATE_PEER2PEER,VIR_MIGRATE_LIVE,VIR_MIGRATE_PERSIST_DEST,VIR_MIGRATE_TUNNELLED”
———————————————————-
Restart Openstack
Restart the required Openstack service as shown below.
root@controller# service glance-api restart
root@compute# service nova-compute restart
root@cinder# sudo service cinder-volume restart
Now the Openstack is ready with Storage Backend as CEPH. All the volumes created are stored as objects in the Volumes pool, glance images created are stored as objects in the images pool and the VM data is stored as objects in the vms pool.
Verifying CEPH with Openstack Integraton
To verify the integration, we need to check whether the volumes, or VM’s or images created in Openstack(via Dashboard or CLI) are actually stored as objects in the respective CEPH pools.
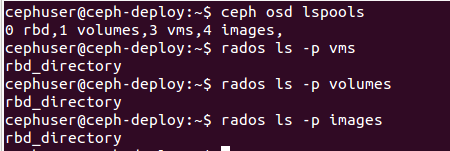
The below screenshots show the ceph pools data when there are no VM’s, images and volumes created in Openstack.
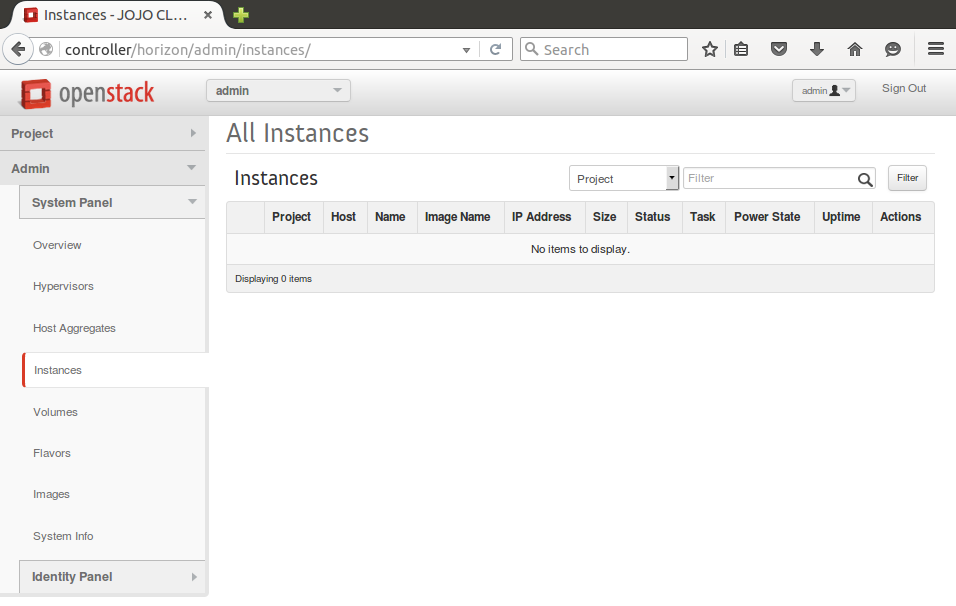
- No Instances or Vm’s in Openstack
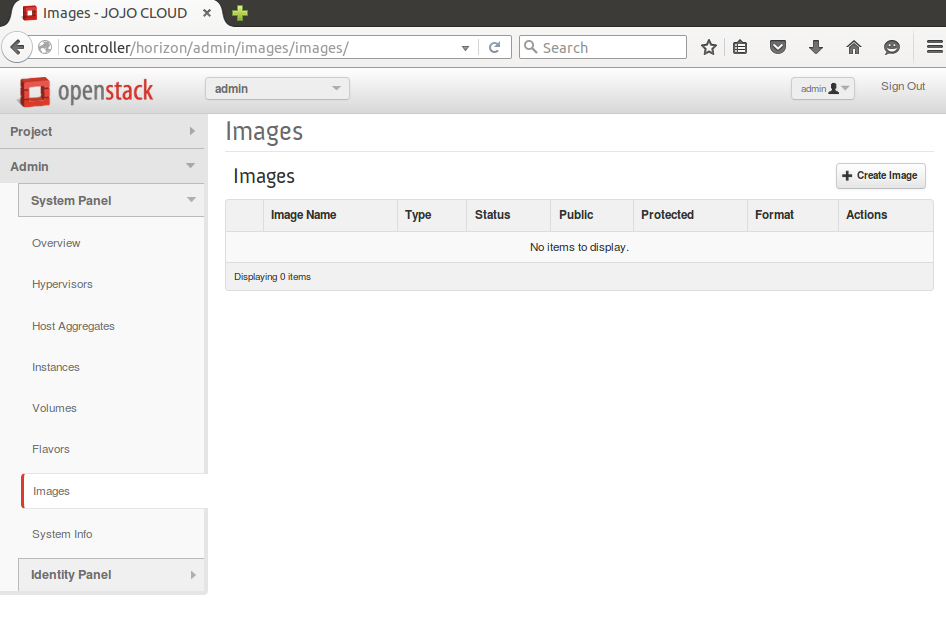
- No Images in Openstack
- No Volumes in Openstack
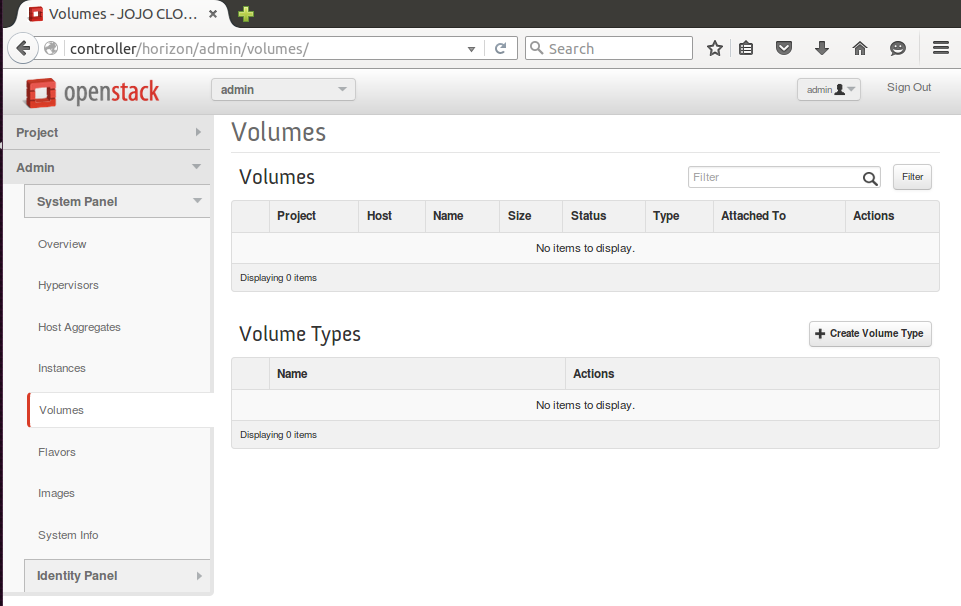
For the above three cases ie; No VM’s created , No Instances created and No Images created, see the below screenshot of the respective CEPH cluster Pools. All the pools are empty with no objects stored.
Now lets see the scenario where we create an Instance, Image and a Volume as shown in the screenshots below.
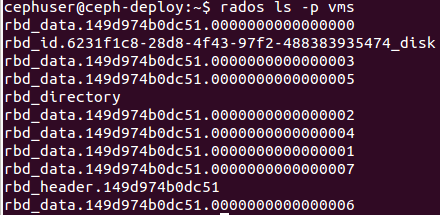
- Instance Created in Openstack
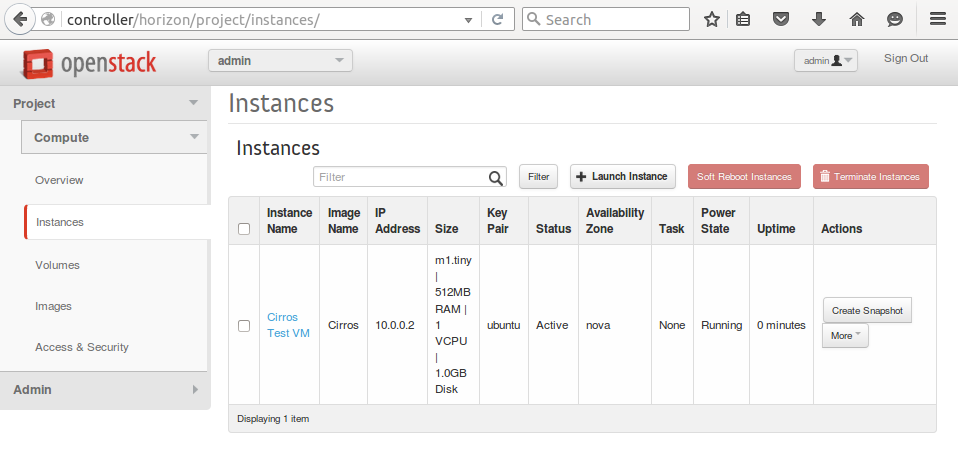
CEPH vms pools objects
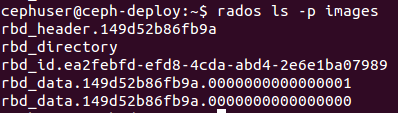
- Image Created in Openstack
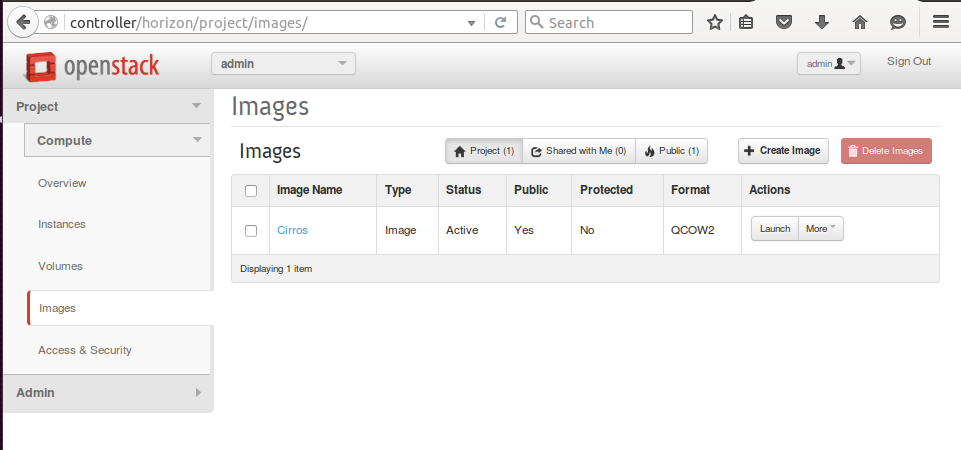
CEPH images pool objects
- Volume Created in Openstack
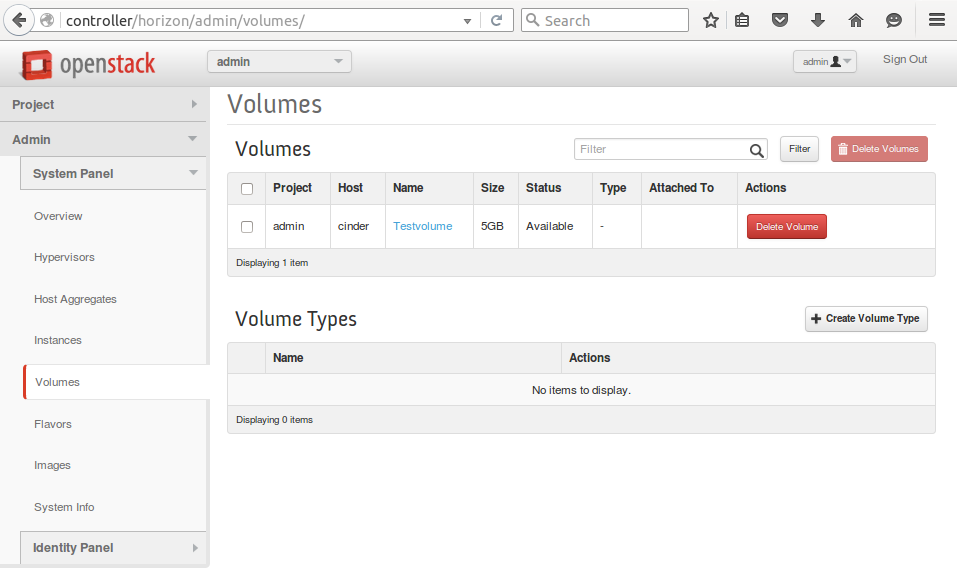
CEPH volume Pool:

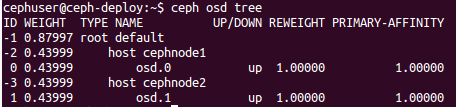
Failover Testing of Storage Cluster (CEPH cluster node FAILS)
The nodes cephnode1 and cephnode2 are the storage nodes that constitutes the RADOS cluster in my CEPH configuration. See the CEPH Cluster tree in the screenshot below .
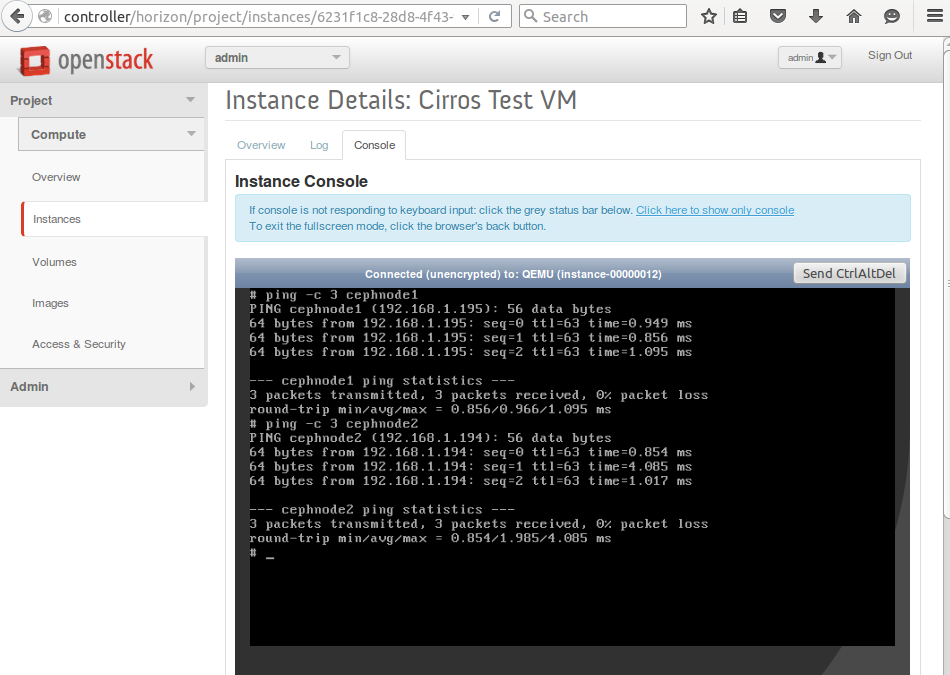
The below screenshots show that both the nodes in the CEPH cluster are UP and the Instance in Openstack(Cirros Test VM) is UP and running. The ping is done from the console of the VM.
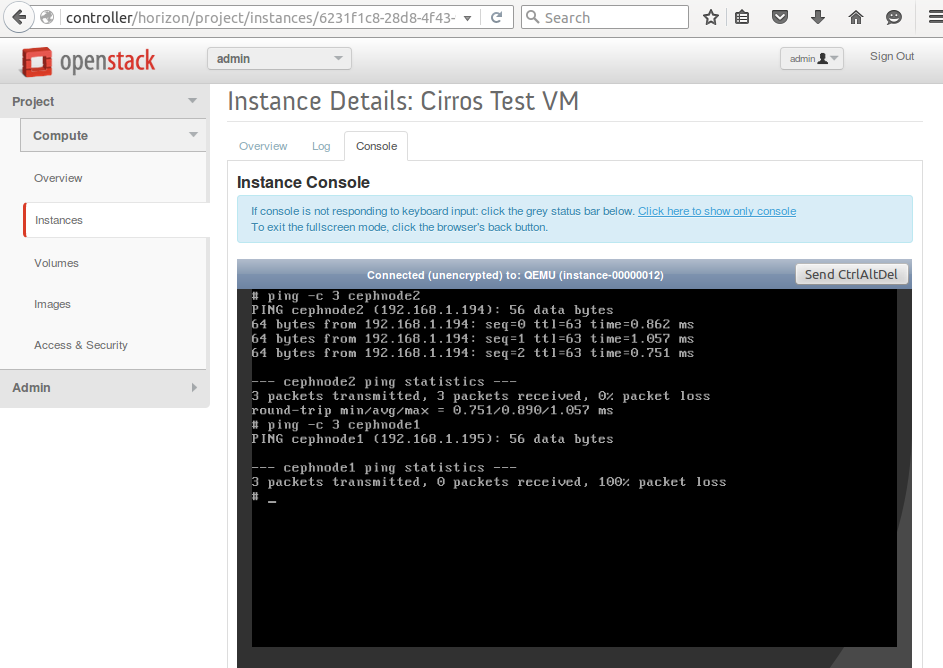
Now I’m shutting down the first storage cluster node cephnode1. As you can see from the screenshot below that the ping on cephnode1 shows 100% data loss or the node is DOWN. Even though one among the storage node is down, the instance or the VM is still UP and running. The ping is done from the console of the VM. This is one among the major advantages of using a CEPH storage backend to use as a Block Storage Service with Openstack.
Recommended Readings
OpenStack Cloud Computing Fundamentals
OpenStack On Ubuntu – Part 1- Prerequisite Setup
OpenStack on Ubuntu – Part 2 – Identity or Keystone Service
OpenStack on Ubuntu – Part 3 – Image or Glance Service
OpenStack on Ubuntu – Part 4 – Compute or Nova Service
OpenStack on Ubuntu – Part 5 – Dashboard or Horizon Service
CEPH Articles
Infinite Storage Scaling Using CEPH -Part-1 [INTRODUCTION]
CEPH – Part 2 – Philosophy and Design
CEPH – Part 3 – Technical Architecture and Components
CEPH- Part 4 – Data Storage using CRUSH
CEPH -Part 5 – Ceph Configuration on Ubuntu
![]()