
Now that Keystone has been installed and configured using the steps given in previous post . Here we are discussing about the implementation of OpenStack Image or Glance Service.
What is Glance?
The Glance project provides a service where users can upload and discover data assets that are meant to be used with other services. This currently includes images and metadata definitions. Glance image services include discovering, registering, and retrieving virtual machine images. Glance has a RESTful API that allows querying of VM image metadata as well as retrieval of the actual image.
It has the ability to copy (or snapshot) a server image and then to store it promptly. Stored images then can be used as templates to get new servers up and running quickly, and can also be used to store and catalog unlimited backups. VM images made available through Glance can be stored in a variety of locations from simple filesystems to object-storage systems like the OpenStack Swift project.
Glance, as with all OpenStack projects, is written with the following design guidelines in mind:
Component based architecture: Quickly add new behaviors
Highly available: Scale to very serious workloads
Fault tolerant: Isolated processes avoid cascading failures
Recoverable: Failures should be easy to diagnose, debug, and rectify
Open standards: Be a reference implementation for a community-driven api
1) Install the Image service/Glance
Install the Image Service on the controller node using the below command
root@controller# apt-get install glance python-glanceclient
The image service uses MySQL as the database to store information. So you need to specify the location of the database in the glance configuration file.
Add/modify the entry shown below in both /etc/glance/glance-api.conf and /etc/glance/glance-registry.conf files under the [database] section.
[database]
connection = mysql://glance:GLANCE_DBPASS@controller/glance
Remember to change the GLANCE_DBPASS with the desired password for the glance database user.
By default, the Ubuntu packages create a SQLite database.
Delete the glance.sqlite file created in the /var/lib/glance/ directory so that it does not get used by mistake
root@controller# rm /var/lib/glance/glance.sqlite
Login to MySQL database as root in the controller node and create the glance database user.
root@controller# mysql -u root -p
mysql> CREATE DATABASE glance;
mysql> GRANT ALL PRIVILEGES ON glance.* TO 'glance'@'localhost' \ IDENTIFIED BY 'GLANCE_DBPASS';
mysql> GRANT ALL PRIVILEGES ON glance.* TO 'glance'@'%' \ IDENTIFIED BY 'GLANCE_DBPASS';
mysql> exit
Remember to change the GLANCE_DBPASS to match the one set in glance configuration file.
Create the database tables for the image service.
root@controller# su -s /bin/sh -c "glance-manage db_sync" glance
Create a glance user that the image service can use to authenticate with the identity or keystone service
root@controller# keystone user-create --name=glance --pass=GLANCE_PASS \ [email protected]
You can chose your own GLANCE_PASS and the email option.
Give the glance user admin role and assign it to service tenant.
root@controller# keystone user-role-add --user=glance --tenant=service --role=admin
Configure the image service to use Keystone service for authentication.
Add or edit the following entries in both /etc/glance/glance-api.conf and /etc/glance/glance-registry.conf under the [keystone_authtoken] section as shown below.
[keystone_authtoken]
auth_uri = http://controller:5000
auth_host = controller
auth_port = 35357
auth_protocol = http
admin_tenant_name = service
admin_user = glance
admin_password = GLANCE_PASS
Edit the GLANCE_PASS to match the one you set for the glance user created using keystone –user-create command. Also modify the following entry under the [paste_deploy] section as shown below
[paste_deploy]
flavor = keystone
Register the image service with the keystone service and create the endpoint.
root@controller# keystone service-create --name=glance --type=image \
--description="OpenStack Image Service"
root@controller# keystone endpoint-create \
--service-id=$(keystone service-list | awk '/ image / {print $2}') \
--publicurl=http://controller:9292 \
--internalurl=http://controller:9292 \
--adminurl=http://controller:9292
Restart glance service for the changes to take effect.
root@controller# service glance-registry restart
root@controller# service glance-api restart
2) Verify the Image service Installation
We need to first download any virtual machine image that is compatible with OpenStack for testing the image service.Download the image to a directory using wget. I’m creating a new directory /tm/images to hold the VM image
 root@controller# mkdir /tmp/images

root@controller# cd /tmp/images/

root@controller# wget http://download.cirros-cloud.net/0.3.2/cirros-0.3.2-x86_64-disk.img
Upload the image to the image service using the following command.
root@controller# glance image-create --name=IMAGELABEL --disk-format=FILEFORMAT --container-format=CONTAINERFORMAT --is-public=ACCESSVALUE < IMAGEFILE
IMAGELABEL – The name with which a user refer to an image.
FILEFORMAT – Specifies the format of the image file. Valid formats include qcow2, raw, vhd, vmdk, vdi, iso, aki, ari, and ami. You can use the file command with the image name as the argument to know the file format.
CONTAINERFORMAT – Specifies the container format. Valid formats include: bare, ovf, aki, ari and ami. Bare is the common container type that almost all images support.
ACCESSVALUE – true (All users can view and use the image) and false (Only administrator can use and view the image)
IMAGEFILE – The name of the downloaded image (cirros-0.3.2-x86_64-disk.img)
Example:
root@controller# source admin-openrc.sh
root@controller# glance image-create --name "Cirros" --disk-format qcow2 --container-format bare --is-public True --progress < cirros-0.3.2-x86_64-disk.img
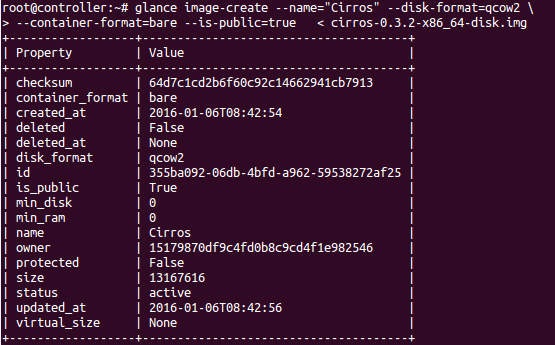
Confirm that the image was uploaded correctly using the below command.
root@controller# glance image-list
If the above command shows the image attributes as shown in the screenshot below, the image service was correctly installed and configured.

Remove the locally downloaded image from /tmp/images, since it is stored and available through the Image Service
root@controller# rm -r /tmp/images
Now we can proceed with the installation and configuration of Compute Service [Nova]
Recommended Readings
OpenStack Cloud Computing Fundamentals
OpenStack On Ubuntu – Part 1- Prerequisite Setup
OpenStack on Ubuntu – Part 2 – Identity or Keystone Service
OpenStack on Ubuntu – Part 4 – Compute or Nova Service
OpenStack on Ubuntu – Part 5 – Dashboard or Horizon Service
OpenStack on Ubuntu – Part 6 – Block Storage or Cinder Service
OpenStack integration With CEPH Block Device (RBD)
![]()